Creating Third Party Bots
Gives guidance on how to get started creating third party bots.
This page is deprecated, and was replaced with the content under the External Bots section. It can be deleted at some point.
Introduction
Creating a third-party chatbot can be very useful for automating tasks such as scheduling a patient visit. How this works is that users can add an external flow step to a chatbot using our chatbot builder. When that step is reached during a chat with a user, we will notify an endpoint in your system that this has occurred and our chatbot execution will pause while your code takes over. Your bot flow can then post messages to the user and receive responses back.
For instance, in our bot builder, you could ask a user if they wish to make an appointment. If they say yes, you could then add a step that will transfer control of the chat to your system. Your system would then post a message to the user that shows them the available time slots that they can choose from. When the user picks a time slot, your system will be notified of the response where you can then book the appointment in your scheduling system. You would then hand control back to our chatbot to finish up the chatbot flow.
Getting Started
Setup Webhook
The first step is to set up a webhook and subscribe to events that you will need for handling incoming messages. We recommend subscribing to:
External Bots Events
Chat Context Events
Chat Status Events
Once subscribed, your webhook endpoint will receive messages from our system for these events. Please note, we send Chat Context and Chat Status events for all chats, not just chats that are participating in a chatbot. You can choose to ignore the messages that are not part of a chatbot execution.
For the purposes of creating a chatbot, you will be interested in the "ExternalBotFlowTriggered" event. When you receive this event, the Medchat chatbot will have paused execution while your system handles all messages to and from the user.
{
  "Type": "ExternalBotFlowTriggered",
  "Timestamp": "2020-09-11T18:20:48.2678017Z",
  "OrgId": "<guid>",
  "ChatId": "<guid>",
  "ChatBotId": "<guid>",
  "ChatBotName": "Appointment Scheduling Bot",
  "ExecutionId" : "<guid>",
  "ExternalBotFlowStepIdentifier": "ExternalScheduler"  // optional Flow Identifier
}
For more information about webhooks, please see the Webhooks guide: Webhooks Guide
Add Execute External Bot step in Chatbot Builder
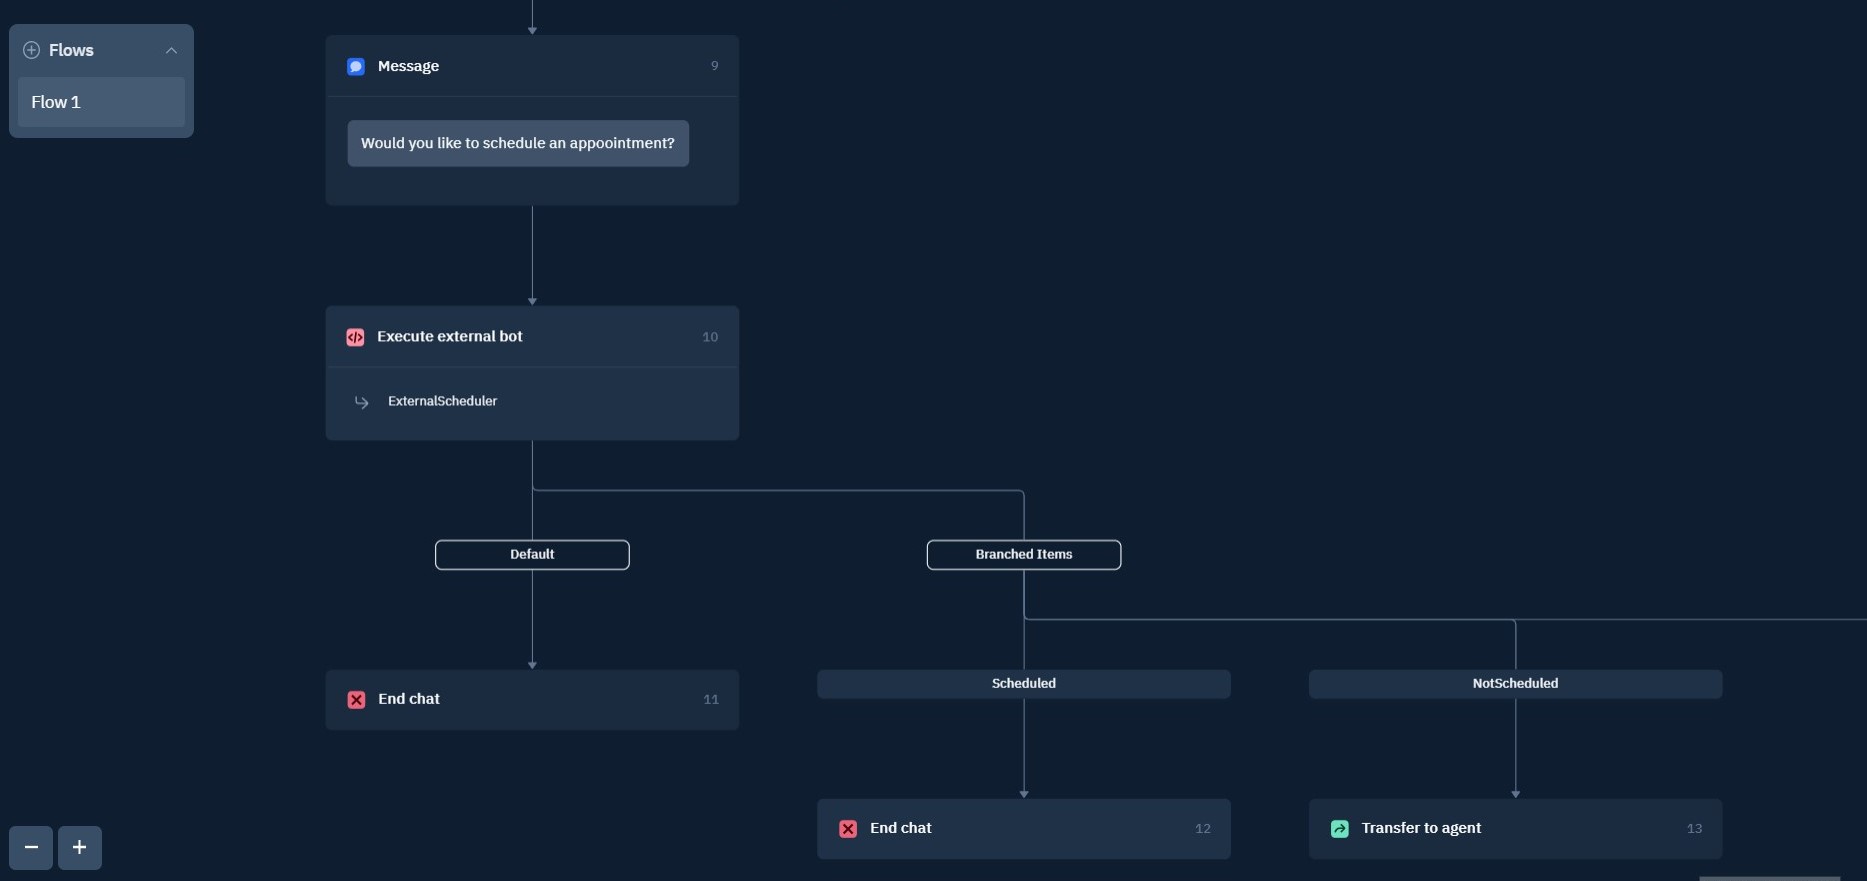
In order to receive the "ExternalBotFlowTriggered" event, a user must first add a "Execute external bot" step in the Chat Bot Builder UI. Users can add an optional "Flow Identifier" that will give your system some context on what is expected. For instance, the "ExternalBotFlowStepIdentifier" could be "ExternalScheduler" for this discussion or just be empty if you only have one type of flow you handle from this endpoint.

Chatbot Builder w/ Execute external bot step
Chat Bot Flow
Once the "ExternalBotFlowTriggered" event is received by your endpoint, you can now start your flow by posting messages to the user.
For more on the anatomy of a message, see the Message Composition Guide and Message Blocks Guide
When users respond to inputs you will receive a "ChatContextUpdated" event. The "ChatContextUpdated" event can then be used to get the user input details from the Get Message Context endpoint. In the response body of the retrieved message context, you can extract the user's response to your question. An example message context might look like this:
{
    "orgId": "39da3946-82e5-5612-0958-cbc25f0e076d",
    "chatId": "aee381d1-f507-e378-3c3d-3a0220269b39",
    "userInputs": [
        {
            "messageId": "67e18bec-eaef-b439-437e-3a022026ce7e",
            "requestMessageId": "df75b1e4-d03f-71e7-1039-3a022026b647",
            "blockId": "df3698b3-4444-9611-8725-45c5761135ec",
            "isPrivate": false,
            "label": "What is the patient's Gender at birth?",
            "values": [
                "Male"
            ]
        }
    ],
    "chatMetadata": []
}
Resuming the Medchat Bot
Once your chatbot flow has completed it's steps, you must let Medchat know that you are done. Use the Resume Execution endpoint to resume the chatbot that transferred control to your system.
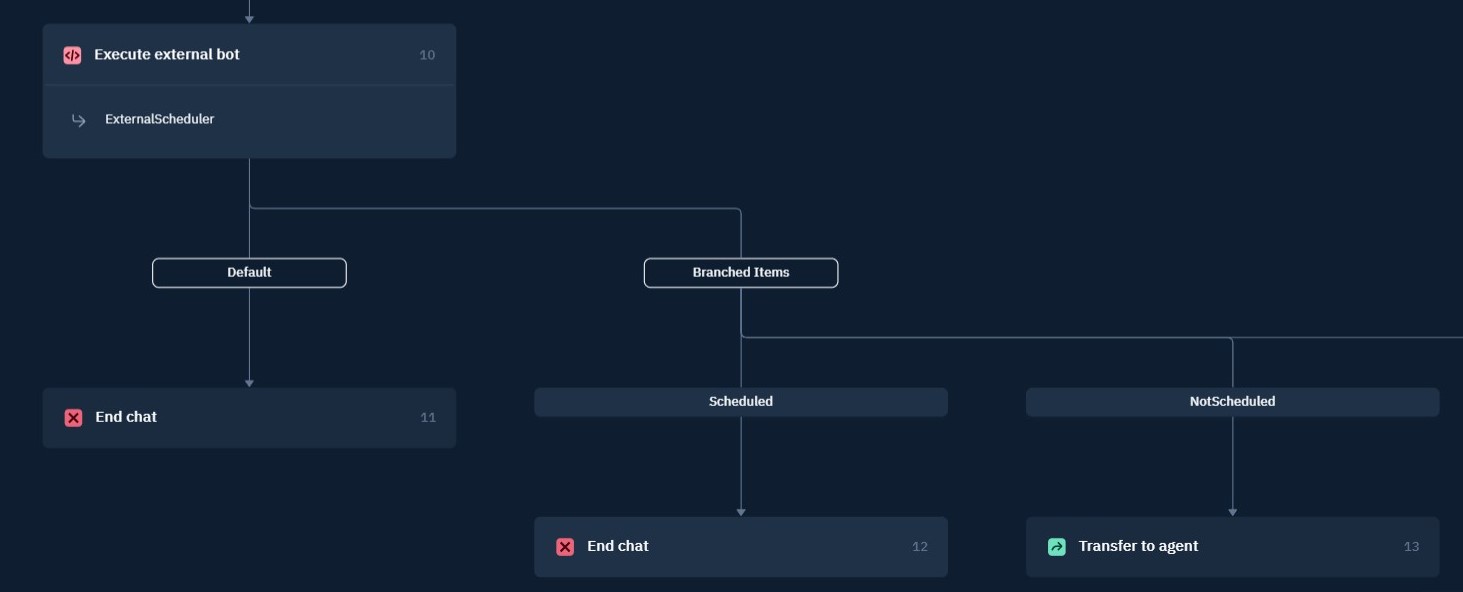
The Resume Execution endpoint accepts an optional return value in case you wish to branch to different steps after the execution of your bot flow. For example, in the image below, the chatbot flow is expecting either "Scheduled" or "NotScheduled" to be returned when the chatbot resumes execution. If no value is returned, the default branch will be executed, which will end the chat.

Branching after the execution of an external bot
Updated 4 months ago
