Walkthrough - Creating an Appointment Scheduling Bot
Now that we've covered some key concepts and we understand the lifecycle of an external bot, let's walk through the steps involved in creating one.
We'll continue with our example of an Appointment Scheduling Bot that was introduced in External Bot Lifecycle.
Your implementation may vary!While this guide will be as specific as possible as far as what is happening on the MedChat side of the service boundary, please note that your implementation will vary depending on the details of how your service is structured and implemented.
Broadly speaking, the steps in setting up the external bot will be the following:
- Setup webhook
- Add Execute external bot step in Chatbot Builder
- Get chat attributes
- Access external systems
- Post messages to the patient
- Receive input from the patient
- Set chat attributes
- Resume the MedChat bot
Steps 3 through 7 above are a part of your external bot's main flow and might vary, be in a different order, or repeat, depending on the requirements for your external bot.These are the main steps that are typical for many external bots, but this list is certainly not prescriptive.
Setup Webhook
The first step is to set up a webhook and subscribe to events that you will need for handling incoming messages. For an external bot, we recommend subscribing to the following categories:
- External Bots Events
- Chat Context Events
- Chat Status Events
Once subscribed, your webhook endpoint will receive messages from our system for these events.
MedChat sends Chat Context and Chat Status events for all chats, not just chats that are participating in a chatbot. You can choose to ignore the messages that are not part of a chatbot execution.
ExternalBotFlowTriggered Event
For the purposes of creating an external bot, you will be interested in the ExternalBotFlowTriggered event. When you receive this event, the MedChat chatbot will have paused execution while your system handles all messages to and from the user.
{
  "Type": "ExternalBotFlowTriggered",
  "Timestamp": "2020-09-11T18:20:48.2678017Z",
  "OrgId": "<guid>",
  "ChatId": "<guid>",
  "ChatBotId": "<guid>",
  "ChatBotName": "Appointment Scheduling Bot",
  "ExecutionId" : "<guid>",
  "ExternalBotFlowStepIdentifier": "ExternalScheduler"  // optional Flow Identifier
}
Upon receiving the ExternalBotFlowTriggered event, you may want to create a record in your system to track the status of this chat bot execution. The key identifiers (orgId, chatId, and executionId that we discussed in Key Concepts) will be used to identify a chat/chatbot execution.
In our Appointment Scheduling Bot scenario, you'll be waiting for ExternalBotFlowTriggered events with an ExternalBotFlowStepIdentifier of ExternalScheduler.
ChatContextUpdated Event
Subscribe to the ChatContextUpdated event to be notified when the patient has submitted a response to an input message block.
Each UserInputAdded item included in the Updated array represents a patient response to an input message block. The patient's response message is referenced by MessageId and can be used to retrieve the message context via an API call to get the value(s) submitted by the patient. RequestMessageId can be used to correlate the response back to the original message that prompted the input.
{
  "Type": "ChatContextUpdated",
  "EventId": "<guid>",
  "Timestamp": "2020-09-11T18:20:48.2678017Z",
  "OrgId": "<guid>",
  "ChatId": "<guid>",
  "Updates": [
    {
      "Type": "UserInputAdded",
      "BlockId": "<string>",
      "MessageId": "<guid>",
      "RequestMessageId": "<guid>"
    }
  ]
}
ChatEnded Event
Subscribe to the ChatEnded event to be notified when the chat has ended to handle early chat terminations.
{
  "Type": "ChatEnded",
  "EventId": "<guid>",
  "Timestamp": "2022-06-09T14:20:57.6169464Z",
  "OrgId": "<guid>",
  "ChatId": "<guid>",
  "ChatEndReason": "EndedByUser"
}
Add Execute External Bot Step in Chatbot Builder
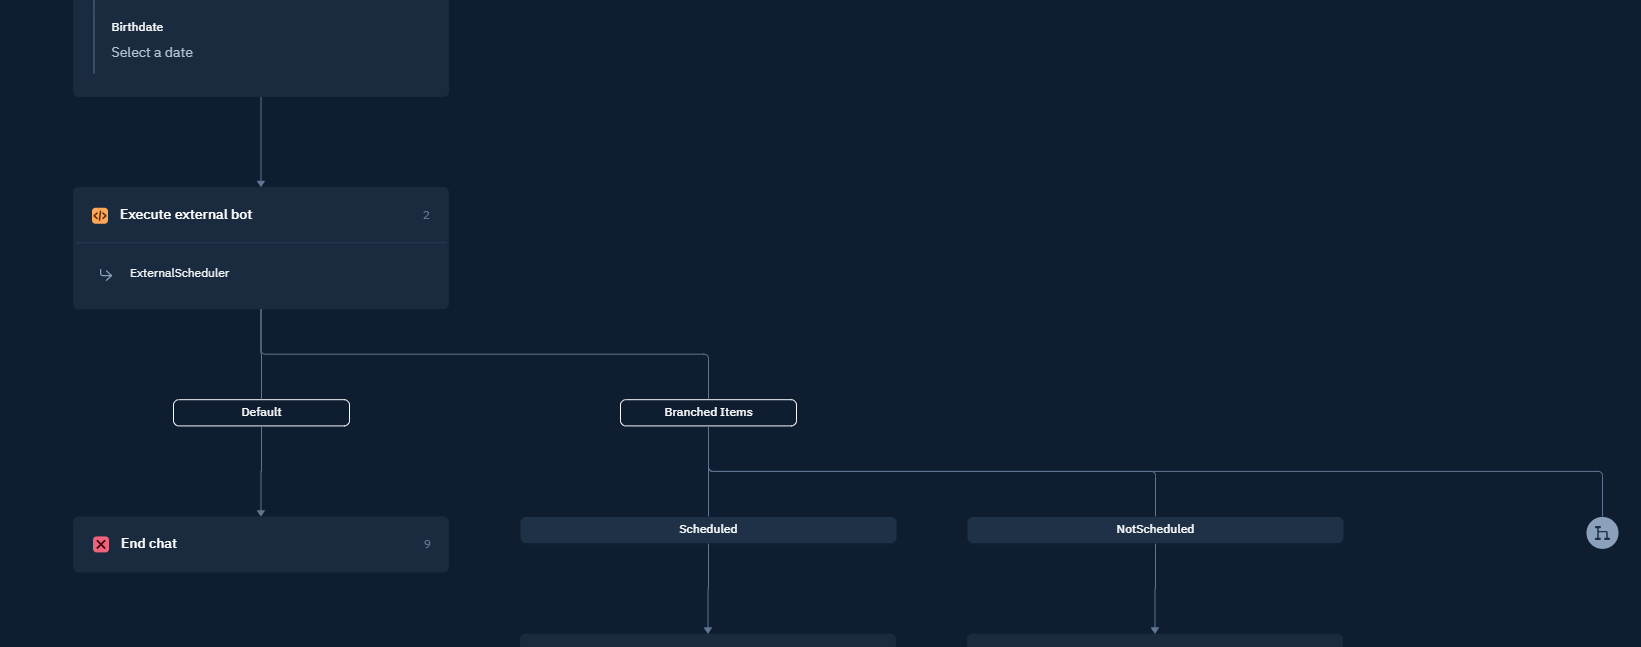
In order to receive the "ExternalBotFlowTriggered" event, a user must first add a "Execute external bot" step in the Chat Bot Builder UI. Users can add an optional "Flow Identifier" that will give your system some context on what is expected. For instance, the "ExternalBotFlowStepIdentifier" could be "ExternalScheduler" for this discussion or just be empty if you only have one type of flow you handle from this endpoint.

Chatbot Builder with Execute external bot step
Get Chat Attributes
Once the ExternalBotFlowTriggered event is received by your endpoint, your bot can start its work. Oftentimes this will start with retrieving the chat context if your bot needs the values of chat attributes or previously entered user inputs.
Use the Get chat context endpoint to retrieve any chat properties, user inputs, chat metadata, and/or chat attributes that have been set up to this point in the life of the current chat.
In our Appointment Scheduling Bot scenario, you'll retrieve the chat context and get the LastName, SSNLast4, and Birthdate attributes from the customAttributes array on the response body.
Access External Systems
Throughout the course of your external bot's execution, you'll likely need to access external system(s) to accomplish the work of the bot.
In our Appointment Scheduling Bot scenario, you'll use the attribute values for the LastName, SSNLast4, and Birthdate chat attributes retrieved in the prior section to look up the patient.
You'll also need to query the external system for available appointments, and, once the patient has selected one, reserve it for them in the external system.
Post Messages to the Patient
It's likely that your external bot may need to post messages to the patient. This is done by calling the Post message API endpoint, passing an array of message blocks in the Body property.
MedChat supports a rich messaging model to support the various types of messages that can be displayed in the widget.
A message can contain one or many message blocks.
For simple text messages to the patient, you'll post a TextMessageBlock, as described in the Text Messages section of the Message Blocks guide.
To prompt the patient for input, you'll post one or more of the many input message block types described in the Input Controls section of the Message Blocks guide.
For more on the anatomy of a message, see the Message Composition Guide and Message Blocks Guide
In our Appointment Scheduling Bot scenario, we need to prompt the patient to select their desired appointment times, from a list of three possibilities.
The request body for the Post message endpoint might look something like this:
{
  "Body": [
    {
      "Id": "7e289da9-9073-9d1f-3960-c70fd66e66a6",
      "Type": "DropDownInputMessageBlock",
      "Label": "Which appointment time would you like?",
      "Placeholder": "Choose your option",
      "IsMultiSelectEnabled": false,
      "IsPrivate": false,
      "AllowCustomInput": false,
      "Options": [
        {
          "Label": "Friday, June 10 at 10:00 AM",
          "Value": "6/10/2022 15:00:00"
        },
        {
          "Label": "Friday, June 10 at 3:00 PM",
          "Value": "6/10/2022 20:00:00"
        },
        {
          "Label": "Monday, June 13 at 8:30 AM",
          "Value": "6/13/2022 12:30:00"
        }
      ],
      "Validators": [
        {
          "Type": "RequiredInputMessageBlockValidator"
        }
      ]
    }
  ]
}
It is up to the logic of your external bot to retrieve the three appointment time options and build them out as options in the message block.
Receive Input From the Patient
When the patient responds to an input message block, a ChatContextUpdated event will be triggered. If you subscribed to the event as described in the Setup Webhook section above, your external bot will receive the event and be able to determine whether it's time to take action.
In our example, when the patient submits their desired appointment time from the drop down message block, a ChatContextUpdated event will fire that looks like this:
{
  "Type": "ChatContextUpdated",
  "EventId": "<guid>",
  "Timestamp": "2022-06-09T18:20:48.2678017Z",
  "OrgId": "<guid>",
  "ChatId": "<guid>",
  "Updates": [
    {
      "Type": "UserInputAdded",
      "BlockId": "7e289da9-9073-9d1f-3960-c70fd66e66a6",
      "MessageId": "8b83509c-e495-83a8-169d-3a045c4a8e3a",
      "RequestMessageId": "9d3f46ba-1e24-5349-aa2e-3a045c4a7d56"
    }
  ]
}
This event has the usual OrgId and ChatId key identifiers which help us match this message to the chat that it is associated with, but it also has a UserInputAdded object with a BlockId that references the BlockId of the DropDownInputMessageBlock in the message we just posted. With this information we know that the patient responded to our prompt.
The event also has the MessageId of the patient's response message, which can be used to pull the message context using the Get message context API endpoint to get the submitted value from the values array on the userInput object:
{
    "orgId": "<guid>",
    "chatId": "<guid>",
    "userInputs": [
        {
            "messageId": "8b83509c-e495-83a8-169d-3a045c4a8e3a",
            "requestMessageId": "9d3f46ba-1e24-5349-aa2e-3a045c4a7d56",
            "blockId": "7e289da9-9073-9d1f-3960-c70fd66e66a6",
            "isPrivate": false,
            "label": "Which appointment time would you like?",
            "values": [
                "06/10/2022 20:00:00"
            ]
        }
    ],
    "chatMetadata": []
}
Input message blocks that allow multiple inputs could have multiple values in thevaluesarray of auserInputobject.
Set Chat Attributes
There may be times when you want to set the value of a chat attribute from an external bot so that it can be used once the MedChat bot execution resumes.
In our Appointment Scheduling Bot scenario, suppose when reserving an appointment for a patient that the external system provides special appointment instructions for the patient. We could put these instructions into a SpecialInstructions string chat attribute that the MedChat bot will display to the patient when it resumes.
Chat AttributesChat attributes are variables that can be used to store pieces of data for a specific chat bot execution.
Chat attributes set during a MedChat bot execution can be accessed from the external bot and vice versa.
Assuming you've already created a string chat attribute named "SpecialInstructions" in the MedChat Chatbot Builder, you can set the attribute from the external bot by calling the Update attribute API endpoint with a request body like the following:
{
  "attributeValue": "Fast for 12 hours prior to appointment."
}
The attribute to update will be specified by the attributeId in the route. The attributeId of the "SpecialInstructions" chat attribute can be obtained from the Get chat context call that was made at the beginning of this walkthrough.
Resume the MedChat Bot
Once your external bot has completed its steps, it must notify MedChat that it's done. Use the Resume chatbot execution endpoint to resume the chatbot that transferred control to your system.
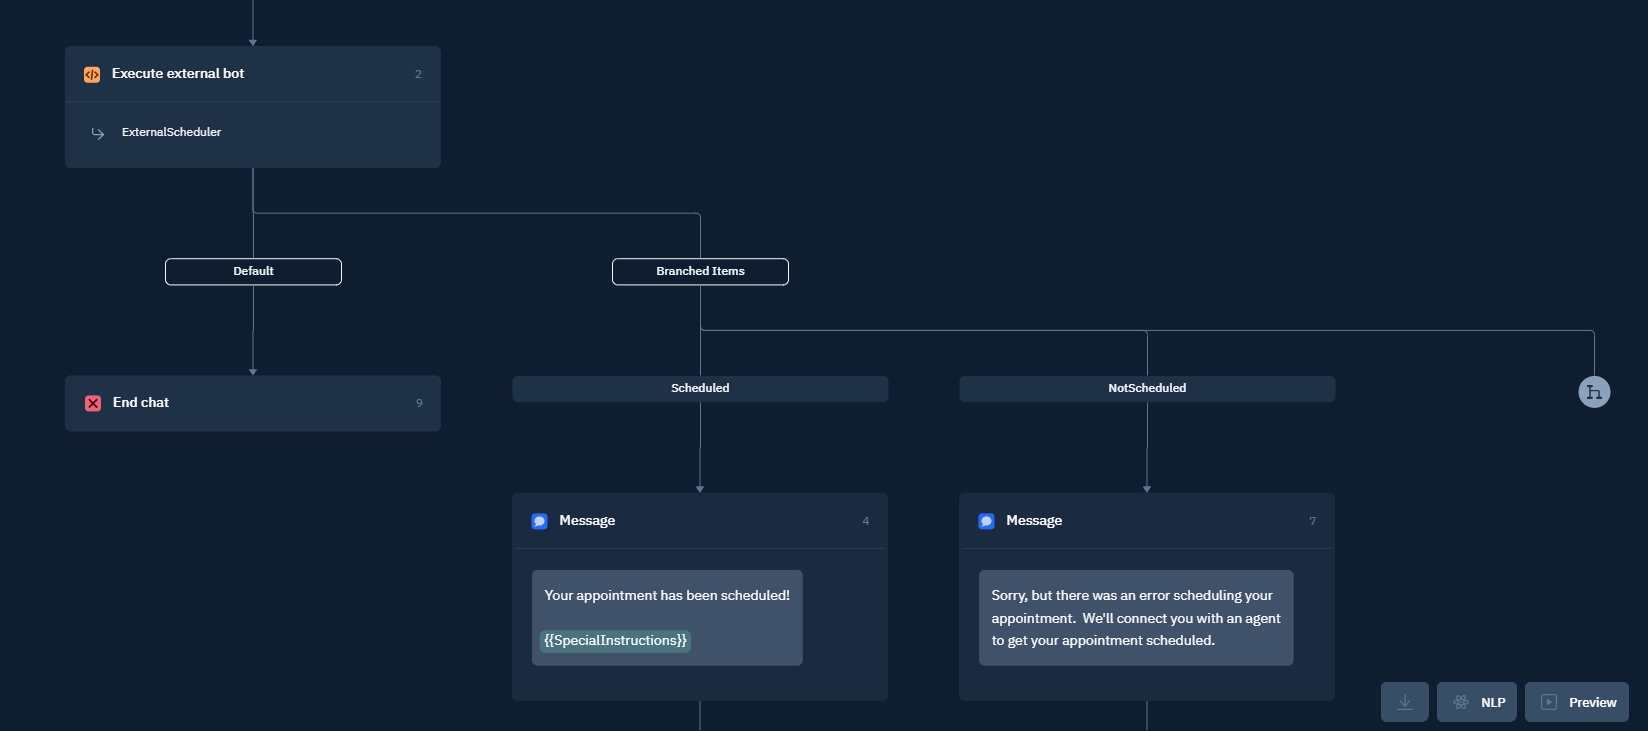
The Resume chatbot execution endpoint accepts an optional return value in case you wish to branch to different steps after the execution of your bot flow. For example, in the image below, the chatbot flow is expecting either "Scheduled" or "NotScheduled" to be returned when the chatbot resumes execution. If no value is returned, the default branch will be executed, which will end the chat.

Branching after the execution of an external bot
Wrapping Up
Congratulations! We've covered a lot of ground, but you've made it through.
In this guide we've touched on the main MedChat integration points involved in building an appointment scheduling external bot. The actions we've covered in this guide will be common to many other external bot scenarios.
Updated 5 months ago
Check out these guides to dive deeper into what you can do with the MedChat message model.
