MedChat Answer Bot
Introduction
MedChat’s Answer Bot is an intelligent knowledge base that is accessible via the MedChat Widget. It can dramatically reduce your call volumes by giving your patients the ability to self-serve using an easy-access FAQ/Wiki content that can provide answers to their immediate inquiries.
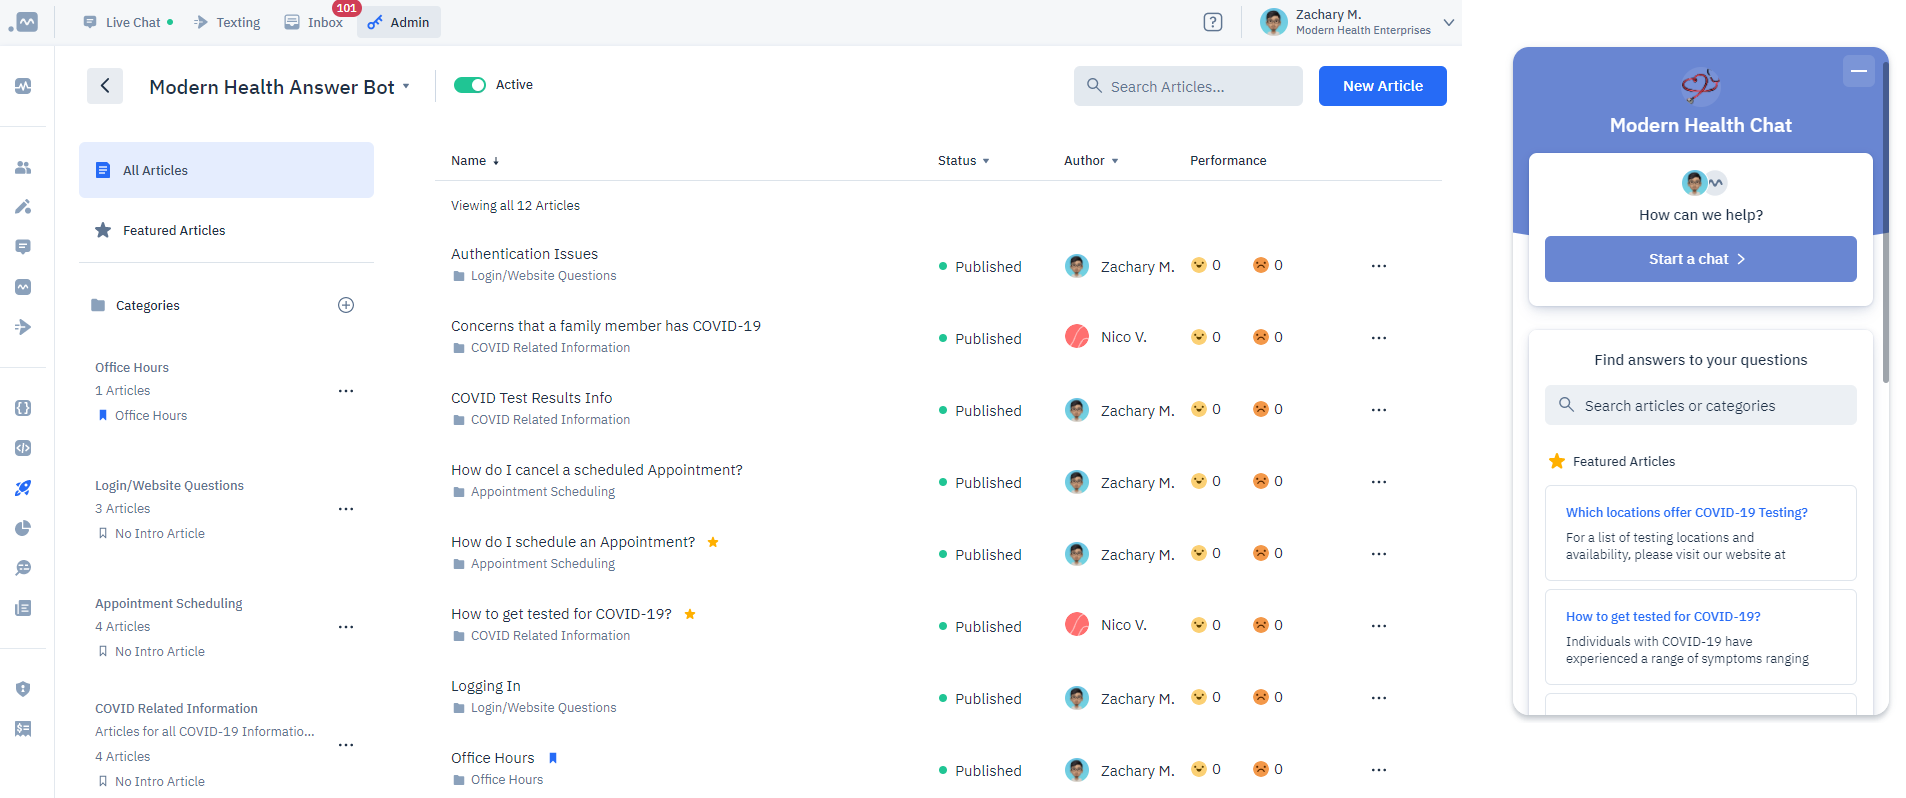
Managing an Answer Bot is simple and easy. You can easily organize content by creating Categories for your knowledge base and the Articles that will fall under them. You can customize your content flow to optimize discovery by your patients with the use of a robust article editor that supports rich formatting capabilities for text, images, hyperlinks, and video.
Answer Bots also gather information about what your patients are searching for, what they’re finding, and if they still need to reach out to your team for additional support. Gap and Trend analytics from Answer Bot searches can provide detailed insight into what articles are most popular, which are performing well, which can be improved, and what gaps you need to fill.
Highlights from the latest version:
- Answer Bots can now be assigned to multiple Widgets
- Articles can now be matched to a specific Widget Topic, allowing patients to quickly start a chat from the article right into the corresponding topic
- New screens available to easily manage Answer Bot-to-Widget and Articles-to-Topic assignments
- Article Editor enhancements: quote, code block, divider, and remove formatting options are now available
- Answer Bot Analytics filtering is now by Answer Bot name instead of Widget name
- Customizable text for Answer Bot prompts
Creating an Answer Bot
You can create an Answer Bot in a couple of ways in Admin: via Boosters, or via Widgets.
Create via Boosters
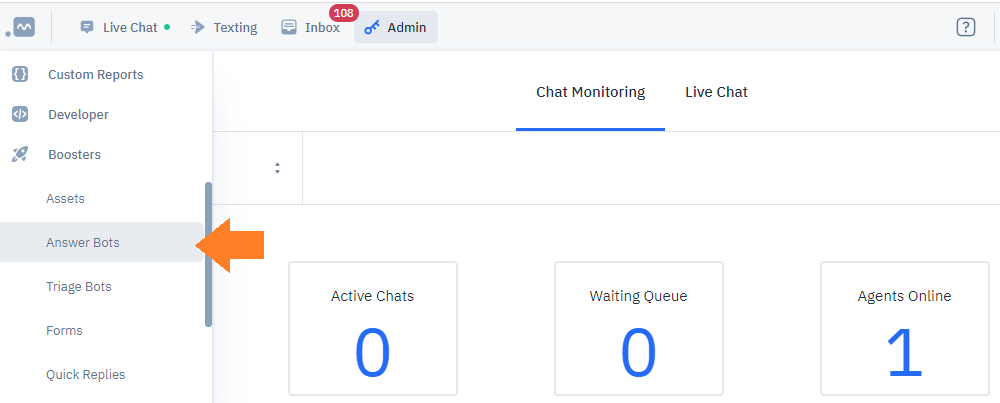
Navigate to Admin > Boosters > Answer Bots on the left-hand side bar. From the Answer Bot Page, click ‘New
Answer Bot’ to get started. Give your Answer Bot a name, assign it to the Widget where it will reside, and create your first Categories and Articles.
Create via Widget
Navigate to Admin > Widgets to pull up the Widgets list page, then click on your specific Widget to pull up the overview page. Scroll down and click on the ‘Create or add an answer bot’ option, give your Answer Bot a name and assign it to the Widget where it will reside.
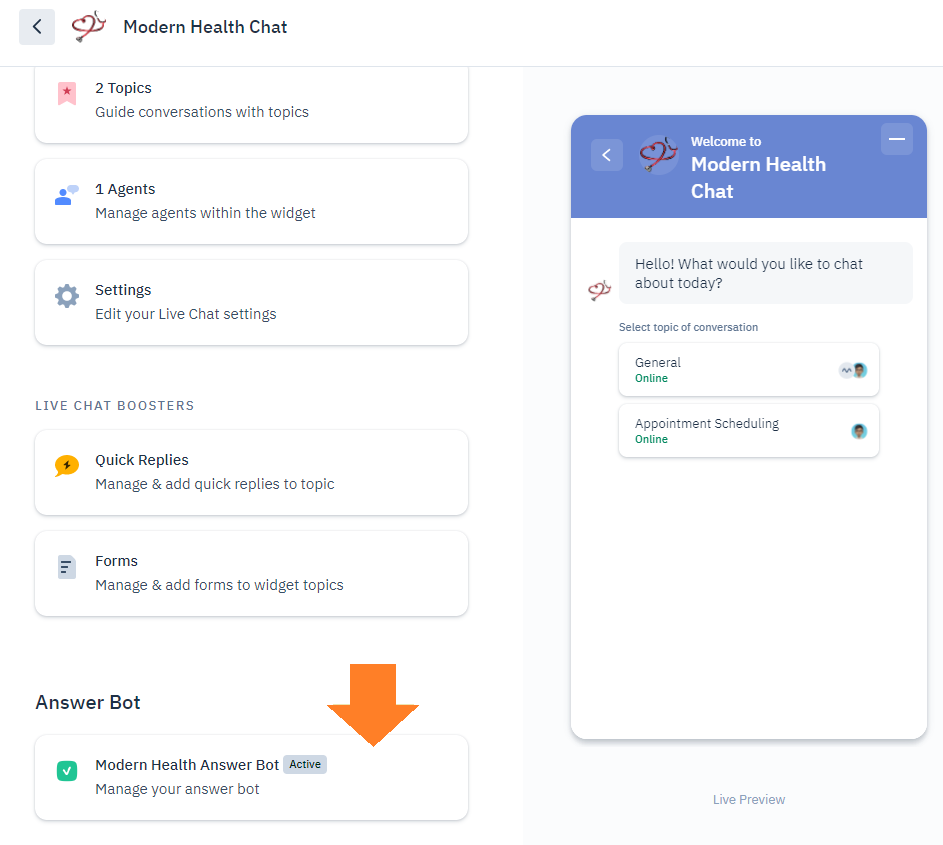
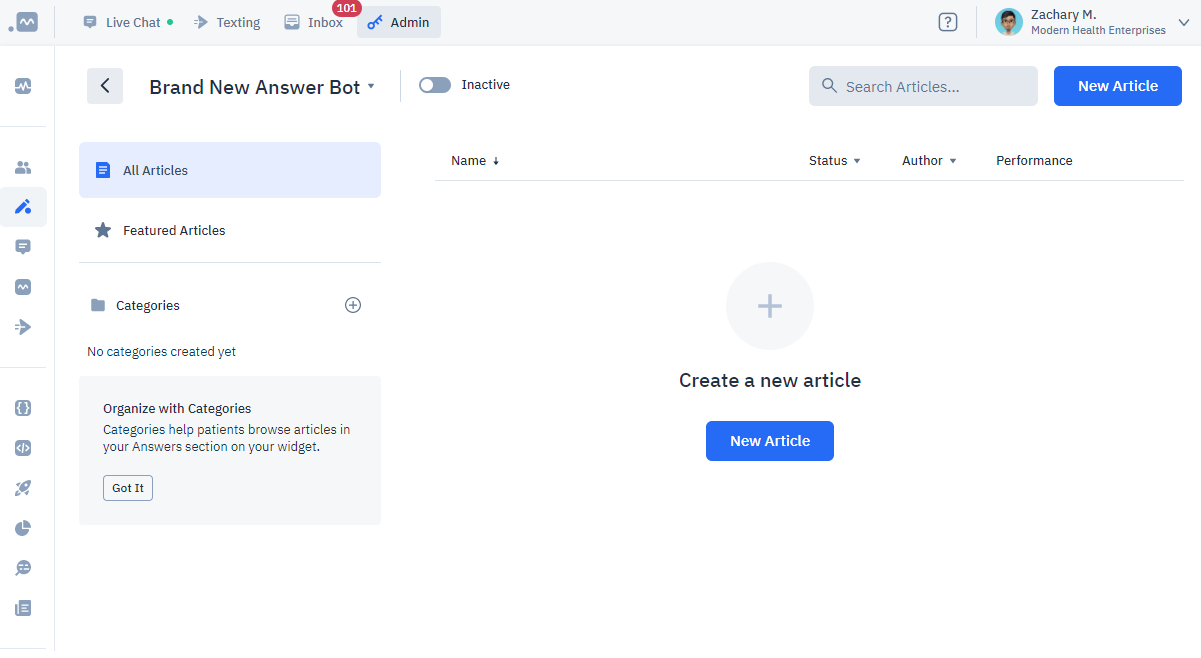
Once you’ve created your Answer Bot, you will be navigated to the Answer Bot Overview page to manage your new knowledge base.
Managing your Answer Bot
The Answer Bot Overview page allows you to manage multiple aspects of your Answer Bot:
- Rename, Change Widget Assignments, and Delete your Answer Bot
- Manage Categories (create, view, delete, sort)
- Manage Articles (create, view, delete, sort) plus additional features
- Filter Article list by Search, by Category, or by Feature Articles
- Activate/Deactivate your Answer Bot
Rename, Assign, and Delete
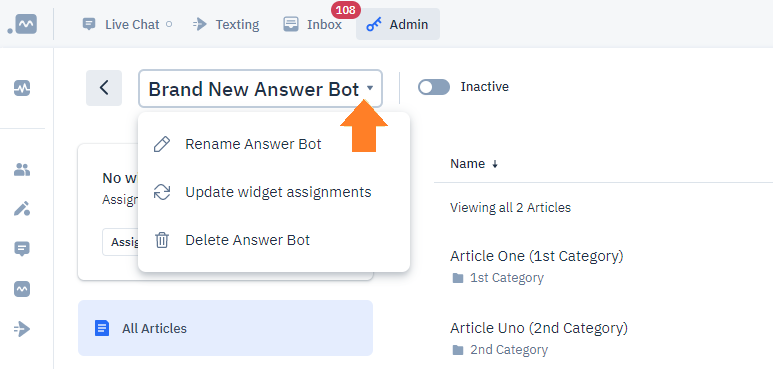
Click on the Answer Bot name at the top of the overview page to activate a menu that allows you to rename it, update its widget assignment(s), or delete it altogether.
Manage Widget Assignments (Enhanced)
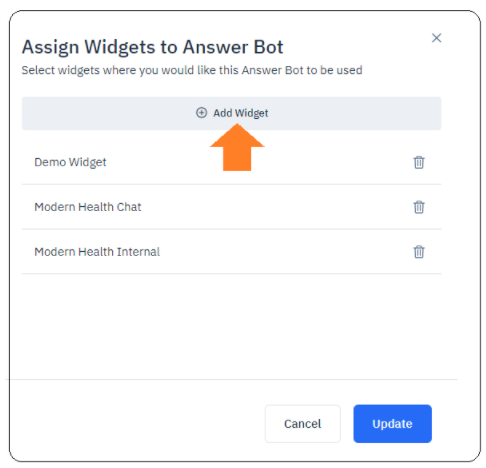
By selecting 'Update widget assignments' under the Answer Bot’s name in the overview page, you can add or remove Widgets where you want your Answer Bot to appear.
Manage Categories
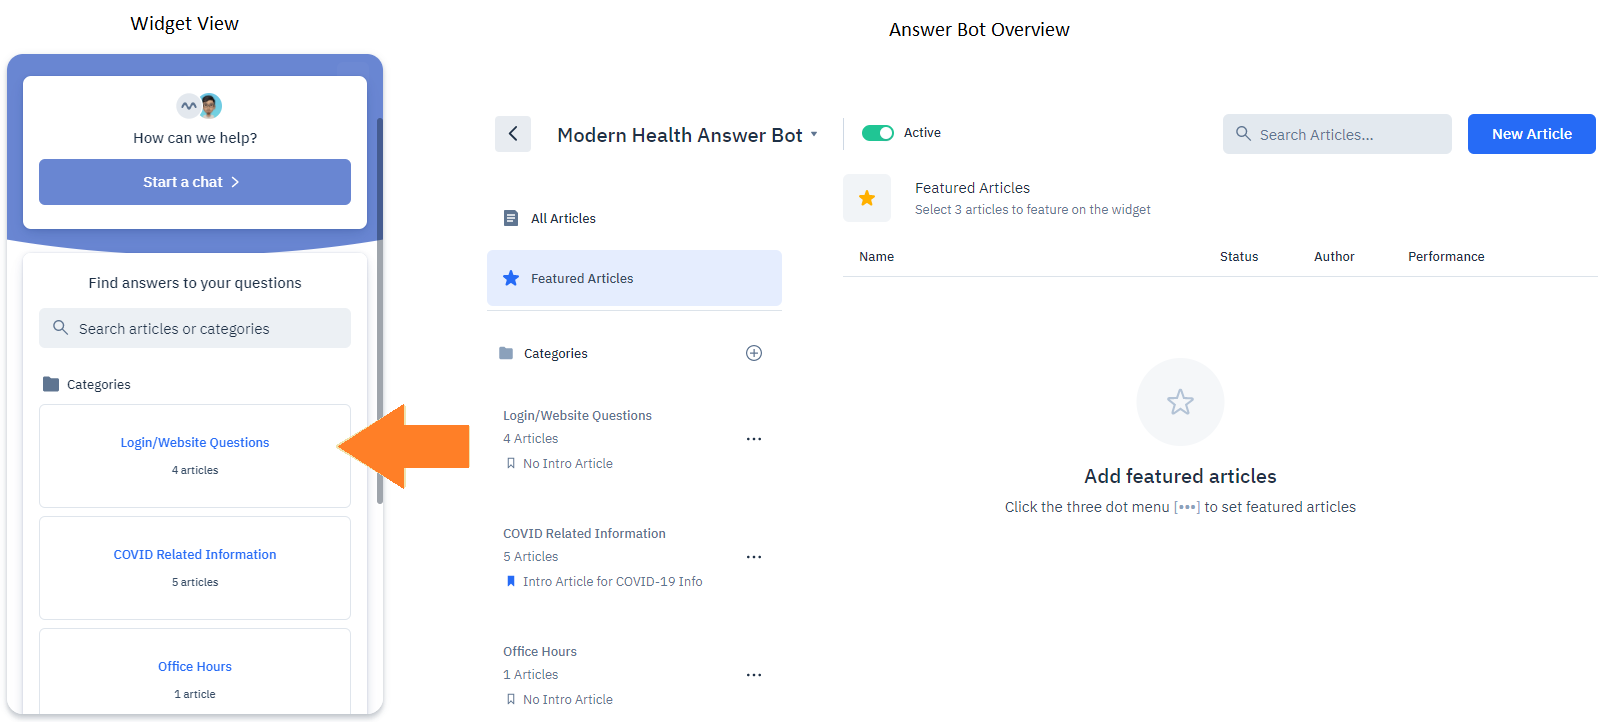
As you begin putting together your knowledge base, you’ll want to group your content by Category. Categories will display prominently on your Answer Bot, and will be the primary topics where your Articles will reside.
Adding a Category
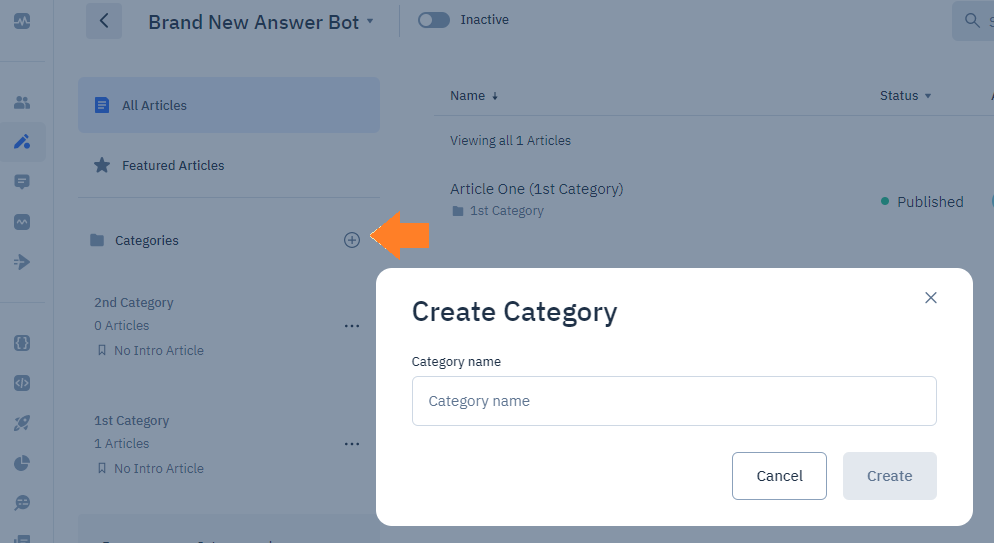
To add a new category, click on the ‘+’ button on the Categories panel, give it a name, and click Create.
Rearranging Category sort order
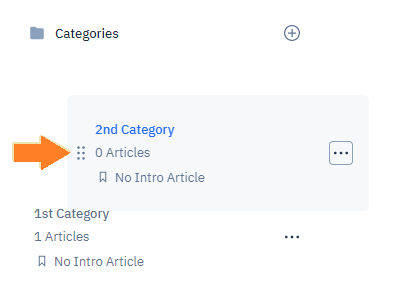
To rearrange Category order for display in your Answer Bot, hover over the item you wish to move to activate the 6-dot icon. Then, click on the icon then drag the Category in the desired order.
Deleting a Category
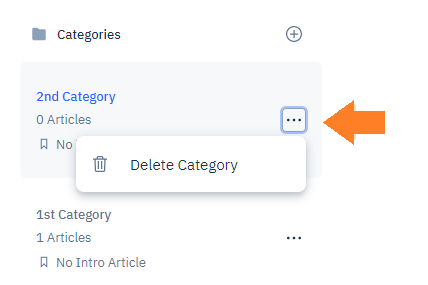
To delete, hover over the Category you wish to remove and click on the 3-dot ellipsis. Then, click Delete Category.
Renaming a Category and adding a Description
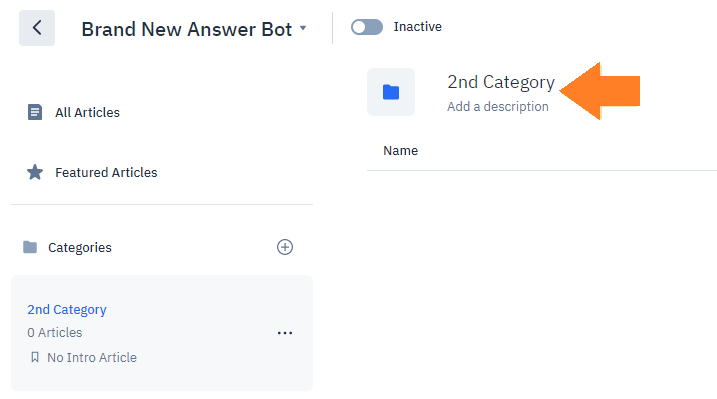
Click on a Category from the left-side pane. Doing so will display the Category and its Articles on the right-side pane. Click on the to category name field or ‘Add a description’ and rename/edit as needed.
Manage Articles
Creating a new Article
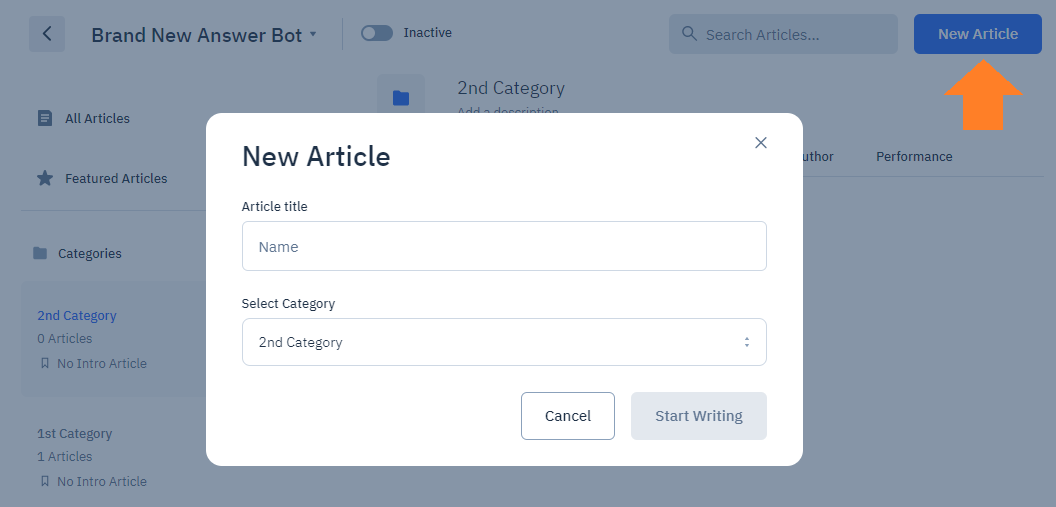
To create a new Article, click on the ‘New Article’ button in the overview page. On the New Article dialog, provide a name and select the Category this article will belong to. Then, click on ‘Start Writing’ to pull up the Article Editor.
Building Articles in the Editor
The Article Editor is where you build your knowledge base content.
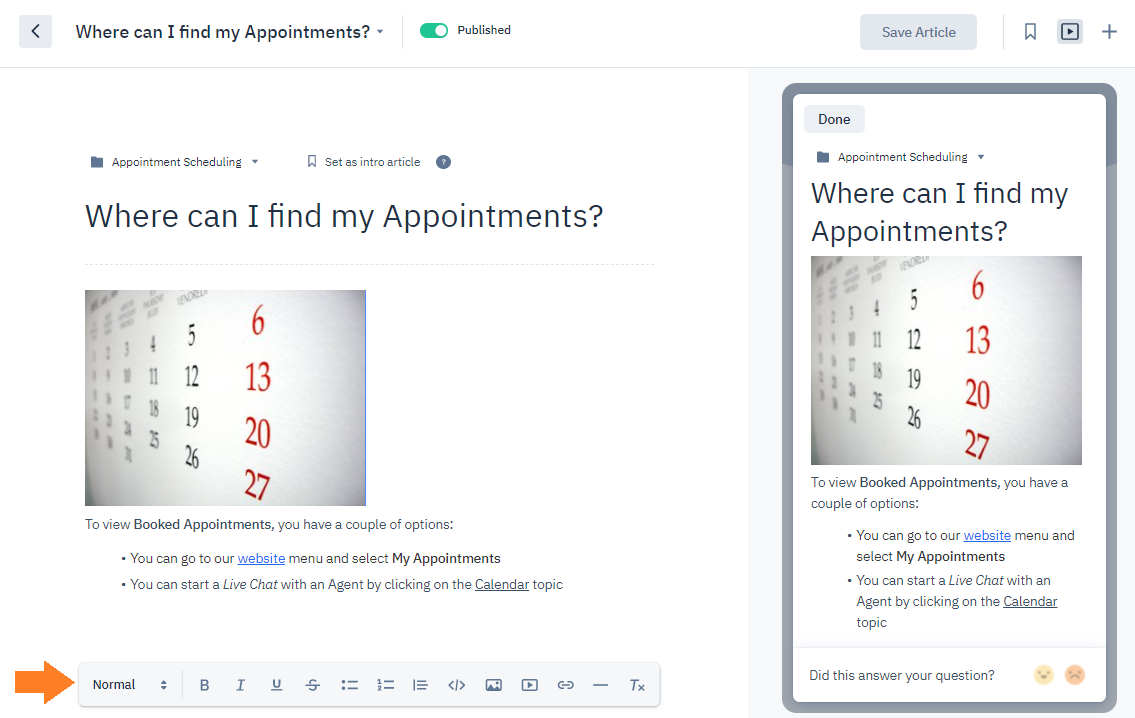
The Article Toolbar provides a robust set of options:
- Text Style: Normal and Headings 1 through 6
- Text Formatting: Bold, Italicized, Underline, and Strikethrough
- Lists: Bulleted and Numbered
- Quote(New): Callout specific texts to highlight in your content
- Code Block(New): Format text in code block format
- Insert Image: Support JPG, PNG, GIF formats
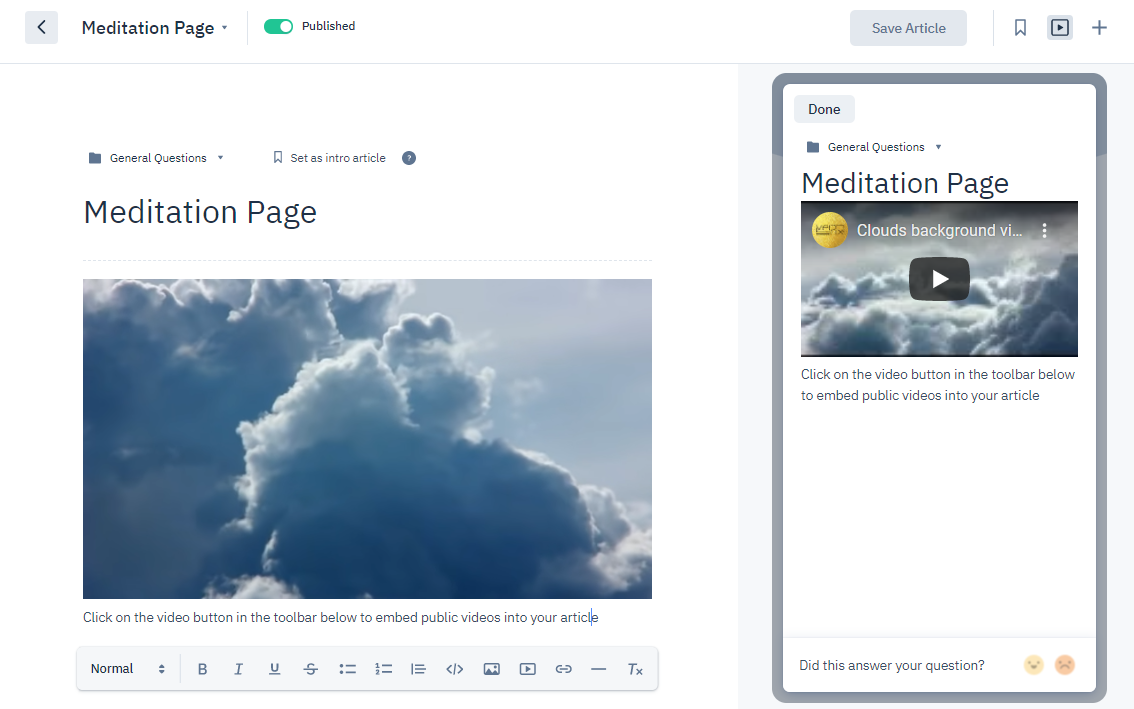
- Insert Video: Link to publicly-accessible videos
- Insert Links: Link to another article within the Answer Bot, or to a web address
- Insert Divider(New): Provide better delineation between your article contents
- Remove Formatting(New): Removes formatting currently applied to content
In the Editor’s top-right corner, you can Save your article, Hide/Show article preview, and Add a new article:
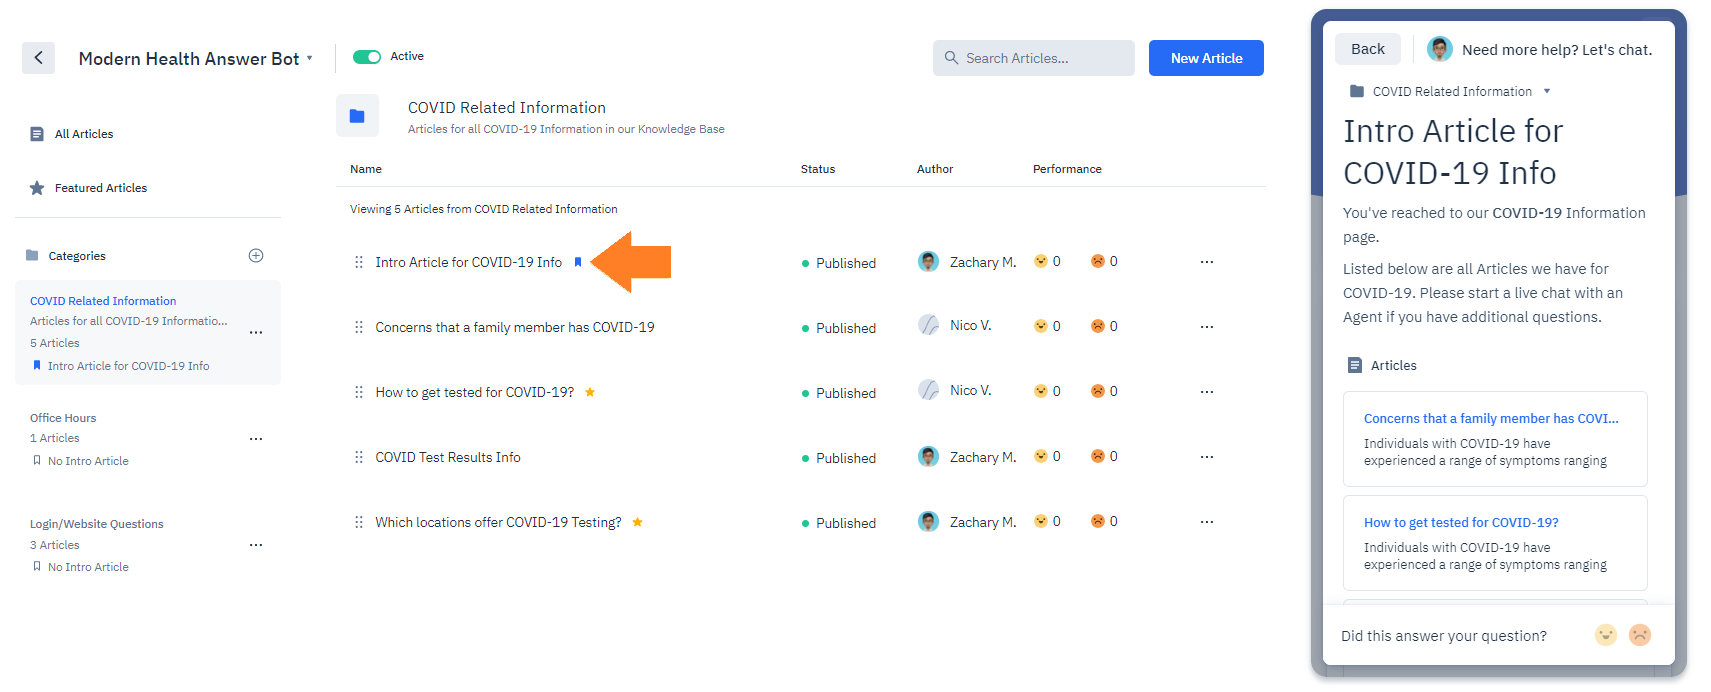
Setting an Intro Article
An Intro Article is the starting custom page you want your visitors to see when they click on an Answer Bot Category.
To designate one, click on the ‘Set an intro article’ button on the Editor page.
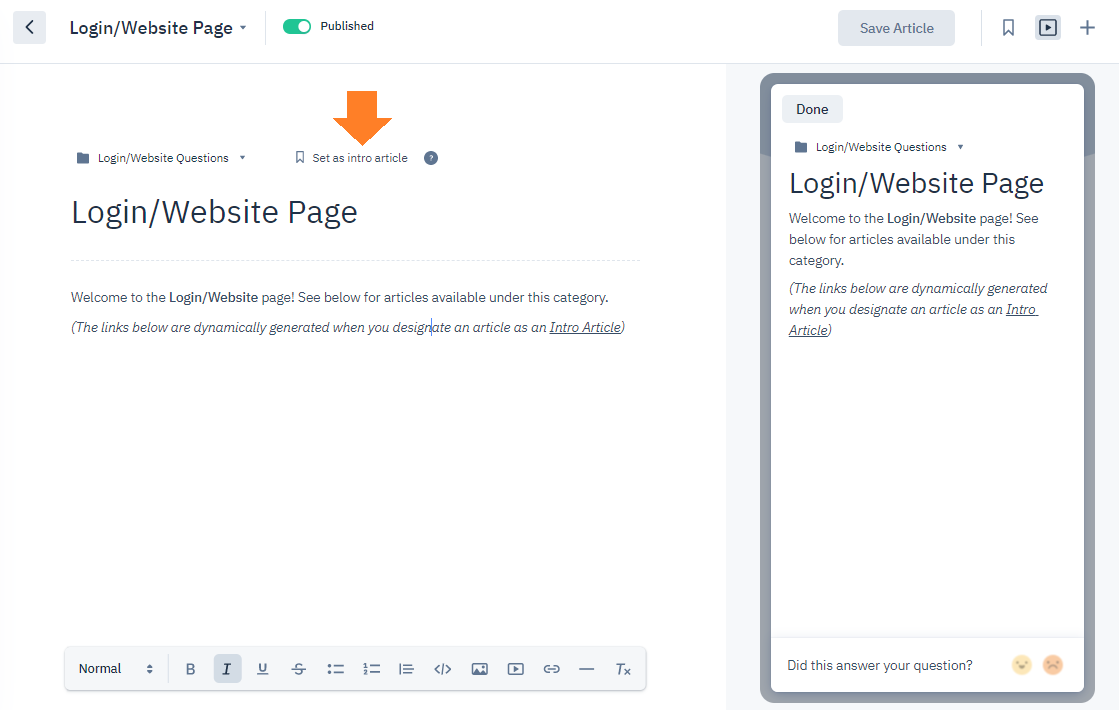
Once you do, all articles within the same category will be automatically inserted in the content.
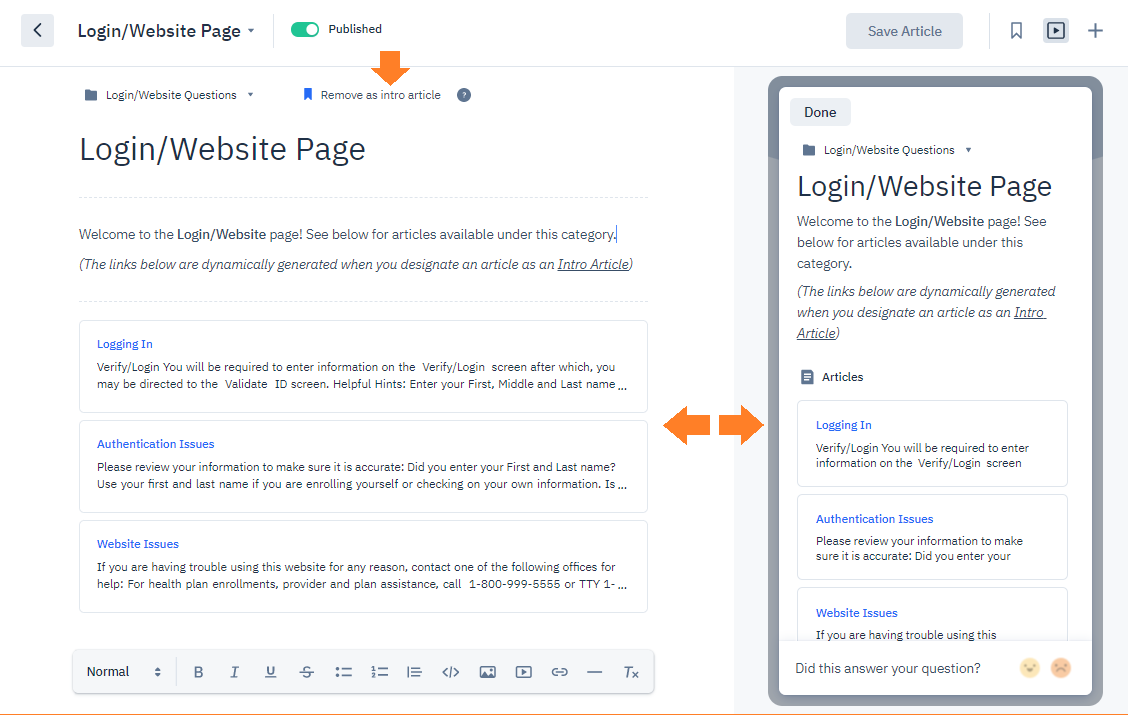
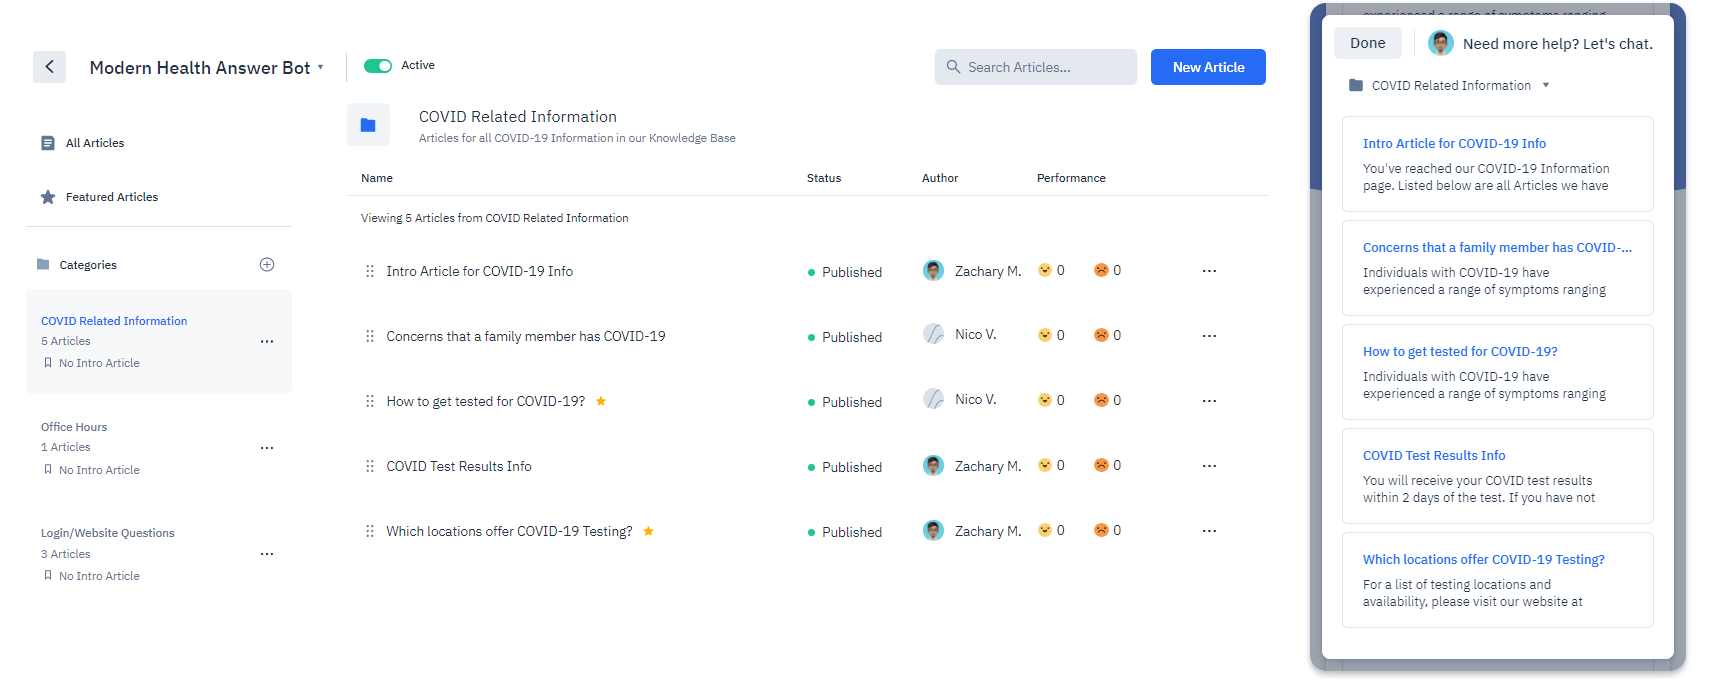
A note about Intro ArticlesIf you do not wish to designate an Intro Article, visitors clicking a category from your Answer Bot will simply show them a list of all articles under their selected category.
Sample Answer Bot view with an Intro Article
The designated ‘Intro Article’ will display when a visitor clicks on the ‘COVID Related Information’ category in your widget’s Answer Bot.
Sample Answer Bot view without an Intro Article
Clicking on the ‘COVID Related Information’ category will simply display a list of all Articles within that category.
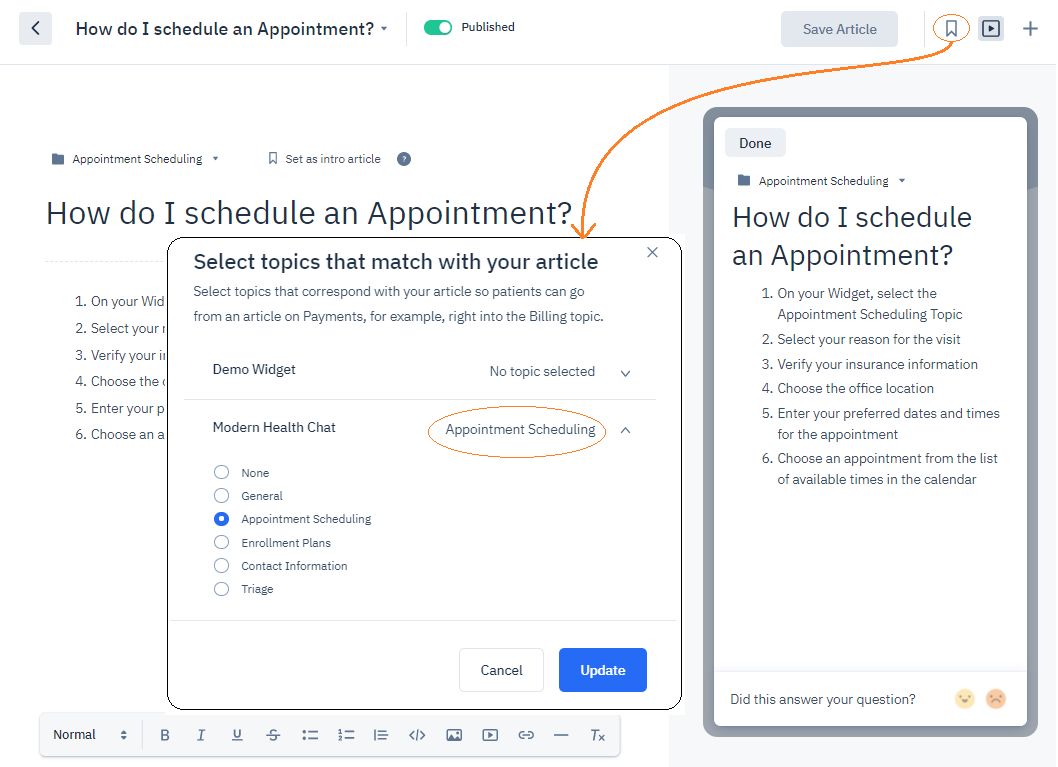
Assigning your Article to matching Topics (New)
You can now associate a Widget topic that best corresponds to your Article. This allows your visitors to quickly go from reading an article, right into a live chat for the corresponding topic.
In the example below, the "How do I schedule an Appointment" article is matched to the 'Modern Health Chat' widget's Appointment Scheduling topic. If a visitor on the article decides to start a chat (via the links available at the top and bottom of the article), then the system will automatically start an 'Appointment Scheduling' Live Chat.
Publishing your Article for live useRemember to toggle your Articles from ‘Draft’ to ‘Published’ once they’re ready for production viewing. Simply toggle back to ‘Draft’ if you want to hide your Article from being accessed.
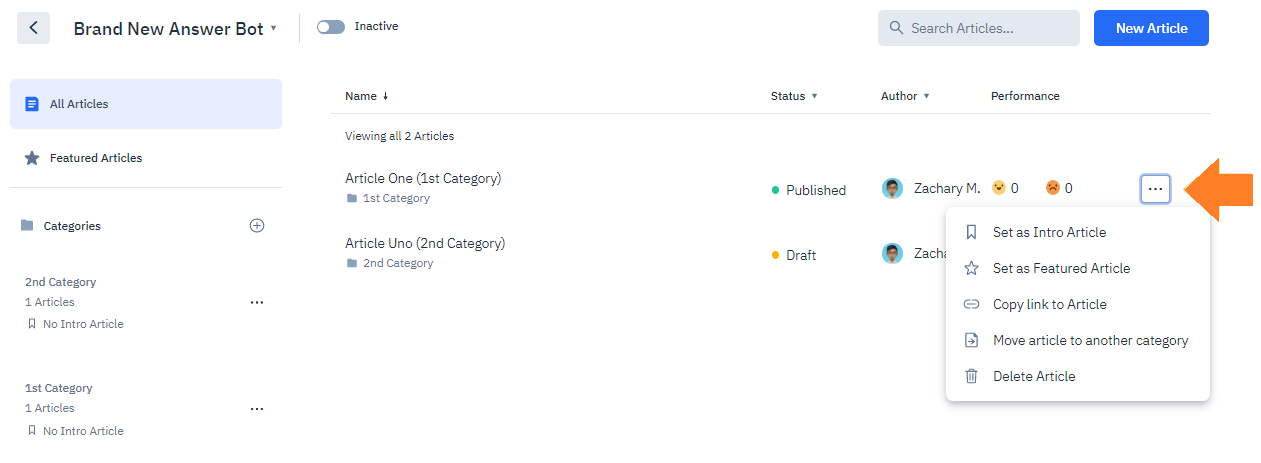
Additional options for listed Articles
Additional article options are available in the Answer Bot overview via the 3-dot ellipsis at the end of each row:
- Set/Remove as Intro Article: assign/unassign an article as the category’s Intro Article
- Set/Remove as Featured Article: Designate up to 3 featured articles to be prominent in your Answer Bot
- Copy link to Article: copies the article’s link for easy insertion into other articles
- Move article to another category: reassign your article to a different category
- Delete the Article: permanently remove the article from your Answer Bot
Filtering your list of Articles
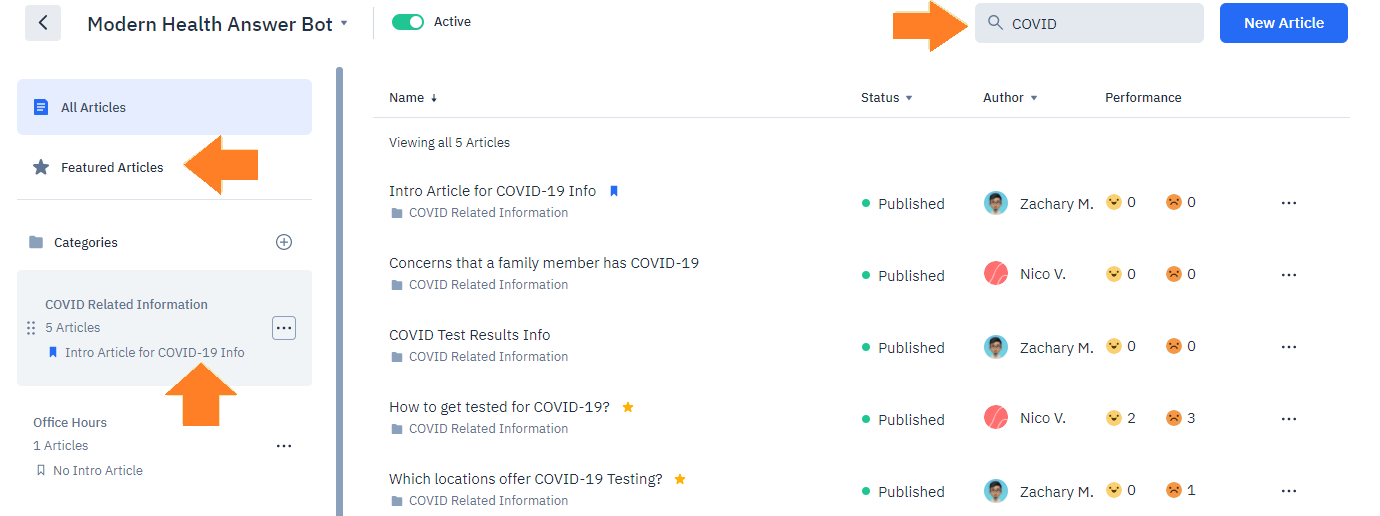
You can filter down the list of articles displayed in the Answer Bot overview by doing the following:
- Use the Search Articles bar found at the top of the page by entering the name of a specific article
- Click Featured Articles on the left-hand panel to only return articles flagged as ‘featured’
- Click on a specific Category to return only articles that belong under that category
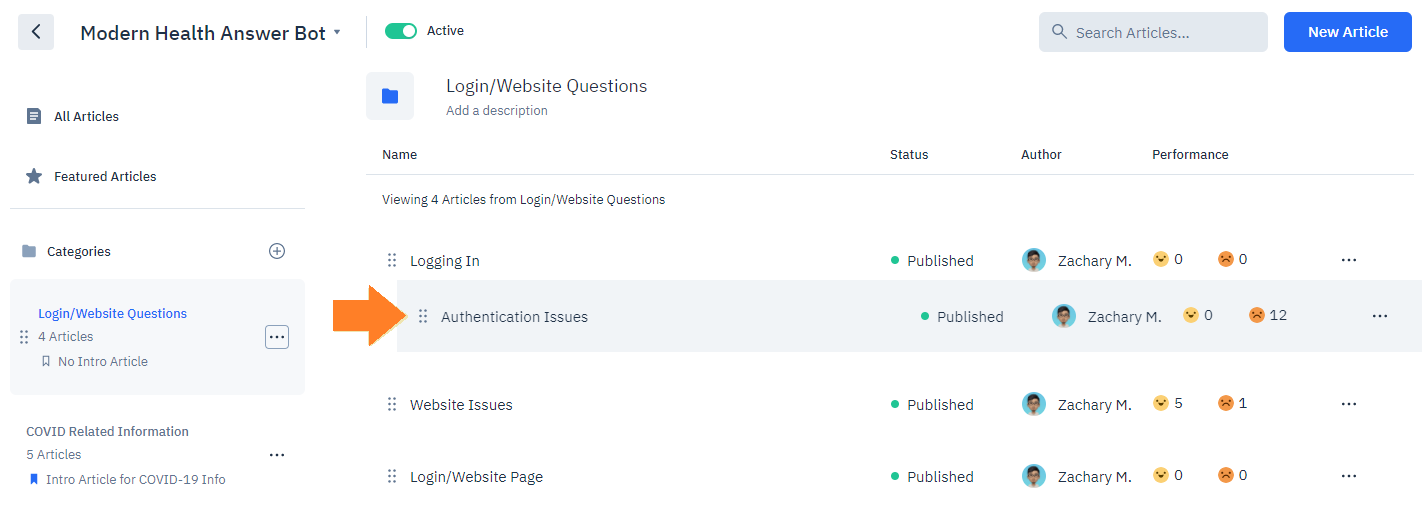
Rearranging Article sort order
To rearrange Article sorting under your Answer Bot category list, hover over the record you wish to move to activate the 6-dot icon. Click on the icon, then drag the Article into the desired order.
Customize Answer Bot message prompts (New)
Under the Live Chat Settings (via Admin > Widget > Widget Overview), you can now customize Answer Bot text displaying on your Widget:
- Live Chat card text - customize the text displaying in your Answer Bot's home page
- In-article call to action text - customize the call to action text within your articles
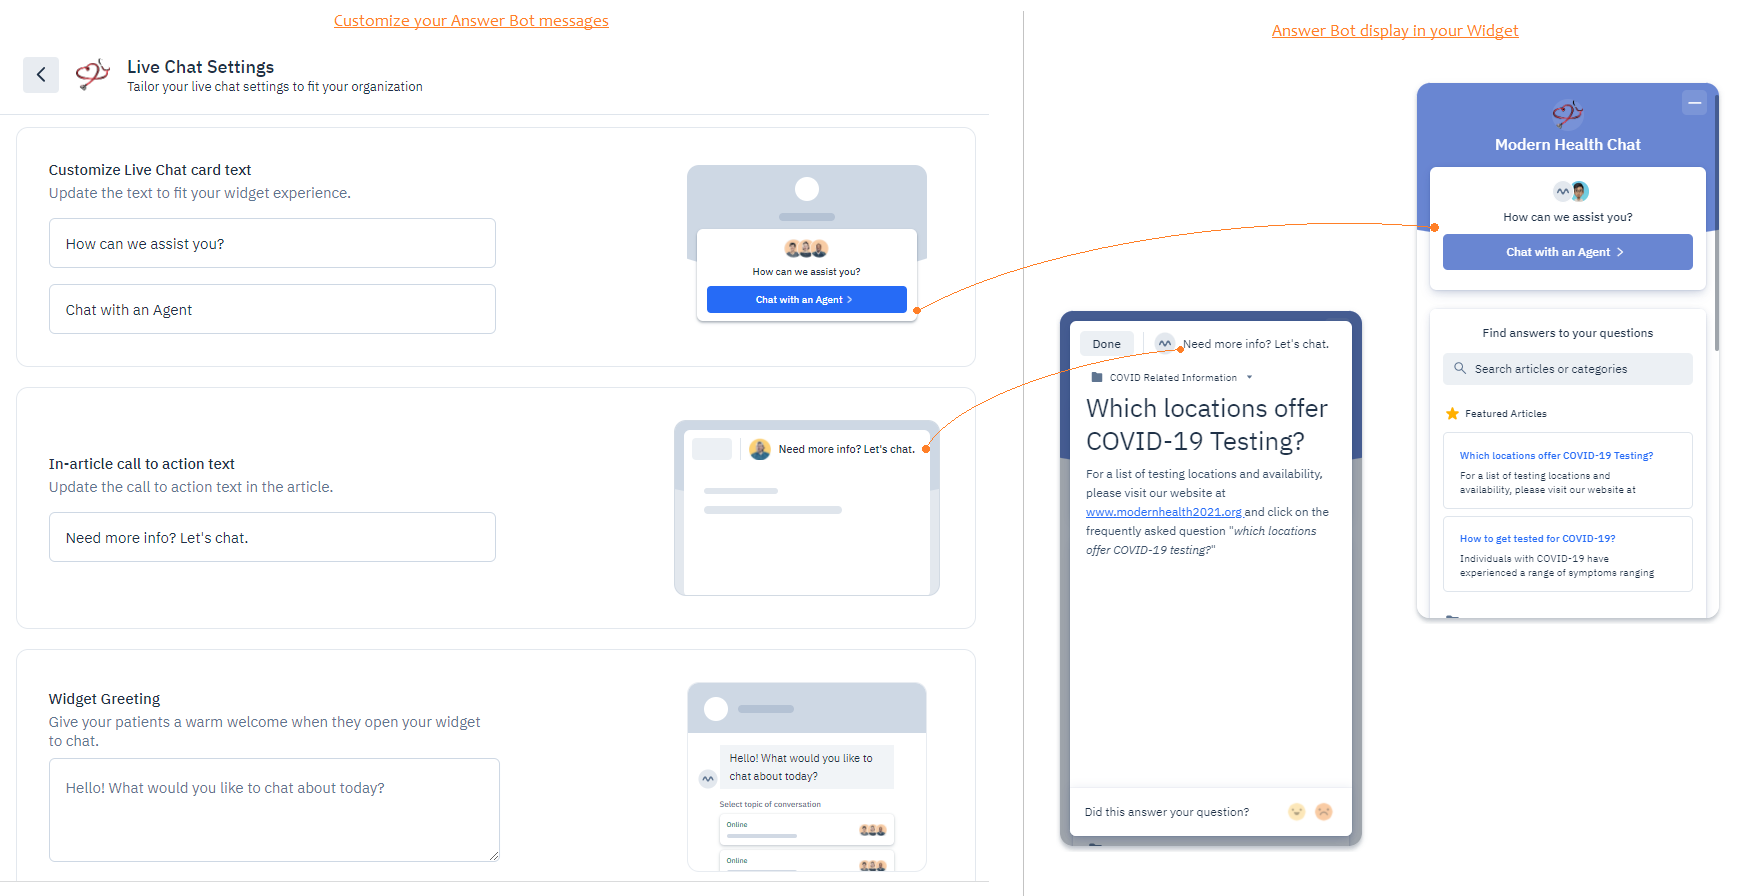
Note: The Live Chat card text and In-article call to action text settings will only appear if you have an Answer Bot assigned to your Widget.
Activating your Answer Bot for live useRemember to toggle your Answer Bot from ‘Inactive’ to ‘Active’ when your Answer Bot is ready to go live on your Widget. If you need to deactivate your Answer Bot, simply toggle it back to ‘Inactive’.
Using Answer Bot in the Widget
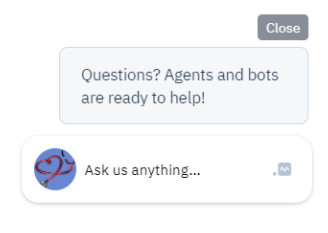
Once you’ve activated your Answer Bot, your Widget Launcher Bar will display “Ask us anything…”, indicating that the Answer Bot is online, and ready for use by your site visitors.
Answer Bot Options
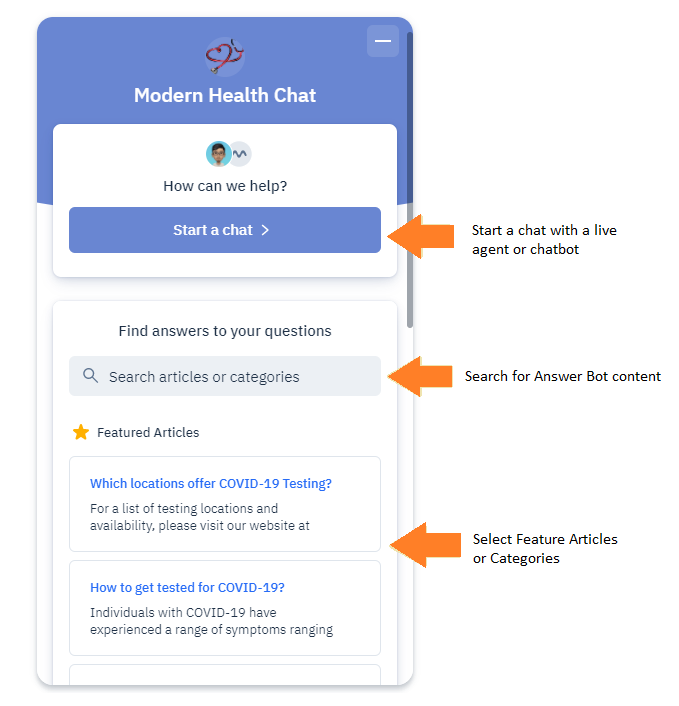
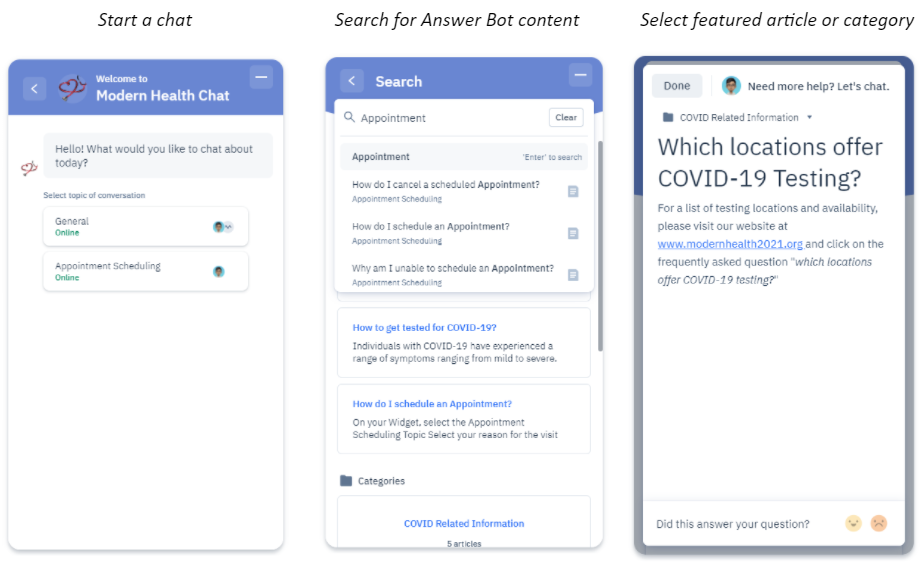
Visitors pulling up Widgets with an active Answer Bot will be shown a new interface that allows them to immediately start a live chat, begin a search of Answer Bot content, or pull up available Featured articles or categories listed in the widget
Visitor feedback/Article Performance
Visitors will be prompted for feedback as to whether or not the Article they viewed was helpful. Feedback will be immediately available to view in the Answer Bot overview Performance column.
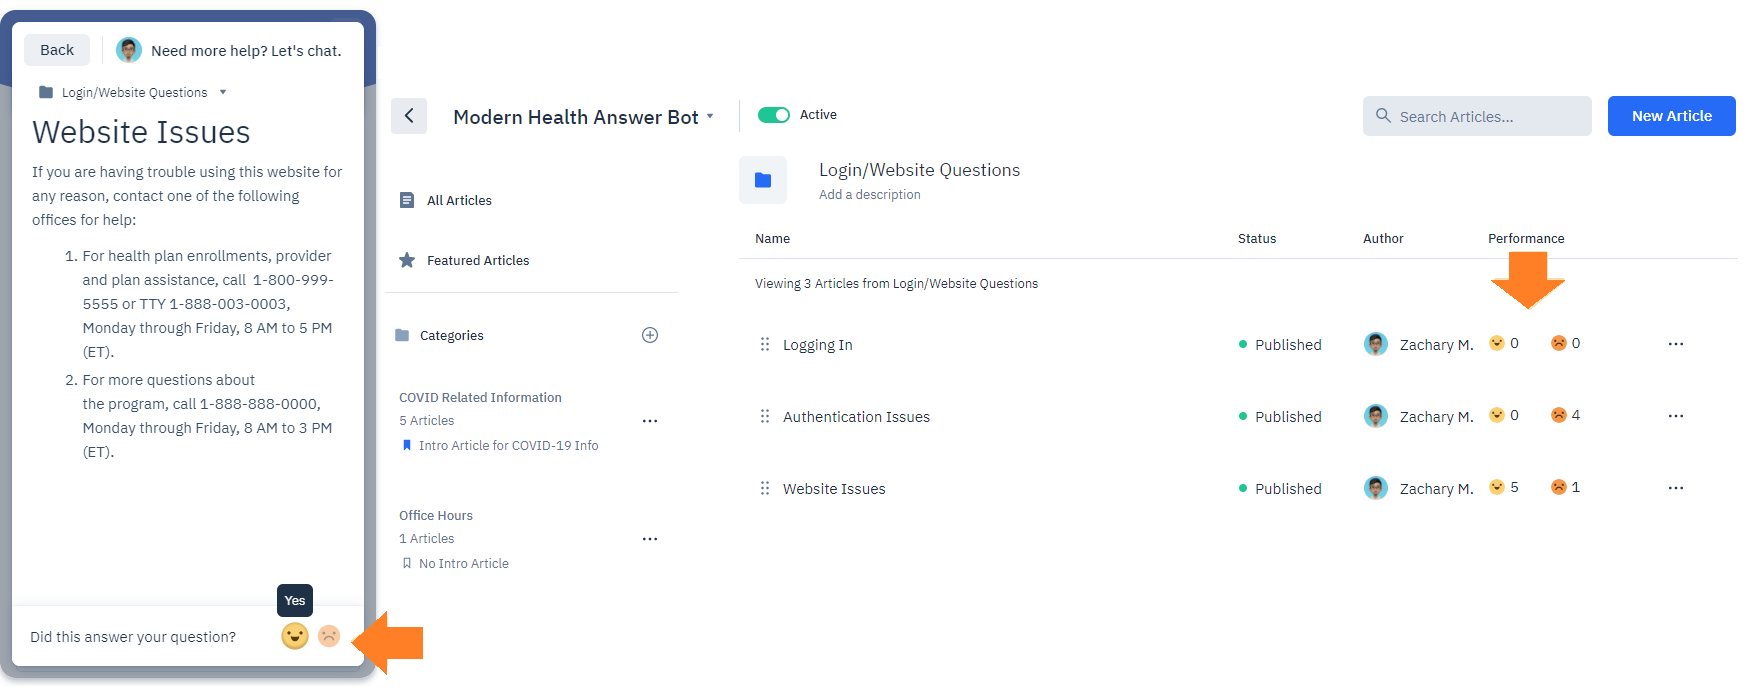
Starting a chat from an ArticleIf a visitor marks an article as not helpful, they will be prompted to start a chat with an available live agent. If the article has been assigned to a specific topic on your Widget, then the chat will immediately start -- no need for your visitor to select from a list of available Widget topics. See section on 'Assigning your Articles to matching Topics.'
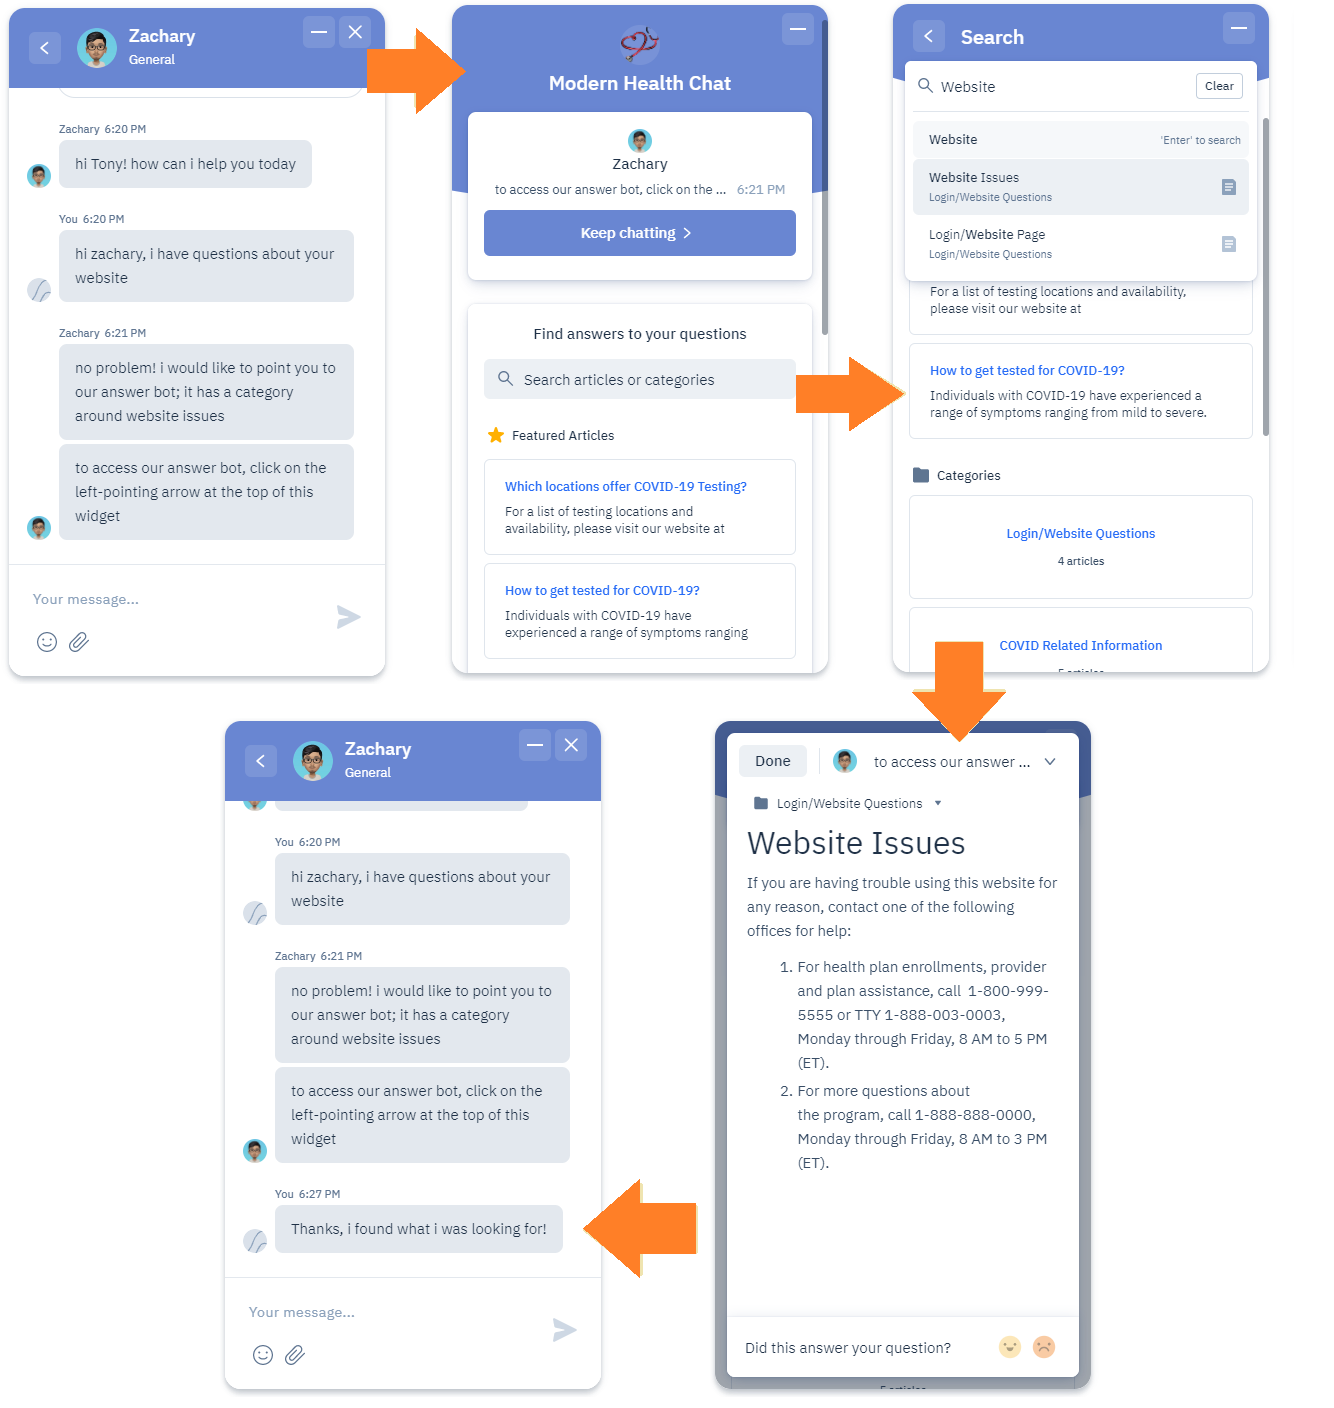
Transitioning between Live Chat and Answer Bot
Visitors are provided quick access to Live Chat agents if they need assistance, wherever they are on the Answer Bot: whether performing searches, reading article content, or flagging an article as not helpful.
Viewing Answer Bot Analytics
To view metrics about your Answer Bot’s performance, navigate to Admin > Analytics > Answer Bot.
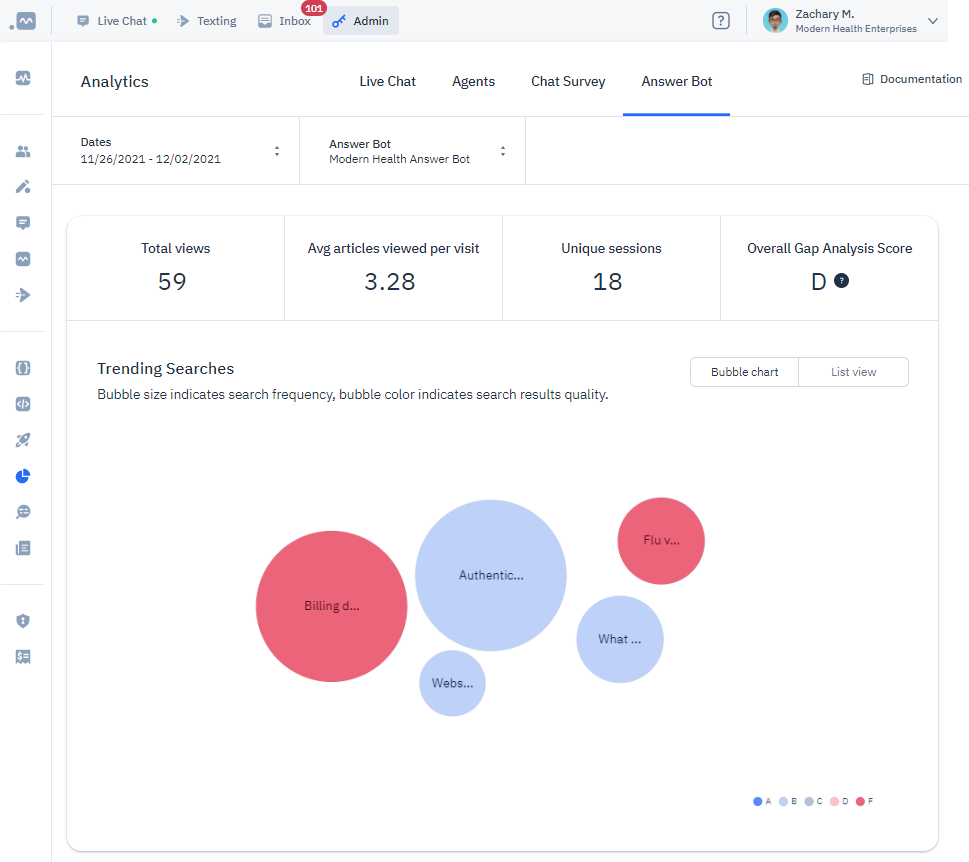
The Answer Bot Analytics page provides various metrics that will help you gauge your Answer Bot's performance. It provides actionable insights into your current knowledge base content, as well as what your customers are searching for.
To use Answer Bot Analytics, select your start and end dates to see how well your Answer Bot performed during that time frame. Then, select the Answer Bot from the dropdown list.
The following metrics are available:
- Total views, Average articled viewed per visit, unique sessions, and overall Gap Analysis Score (i.e., grade for how well patient searches relate to your available articles)
- Trending Searches by visitors of your Widget/Answer Bot
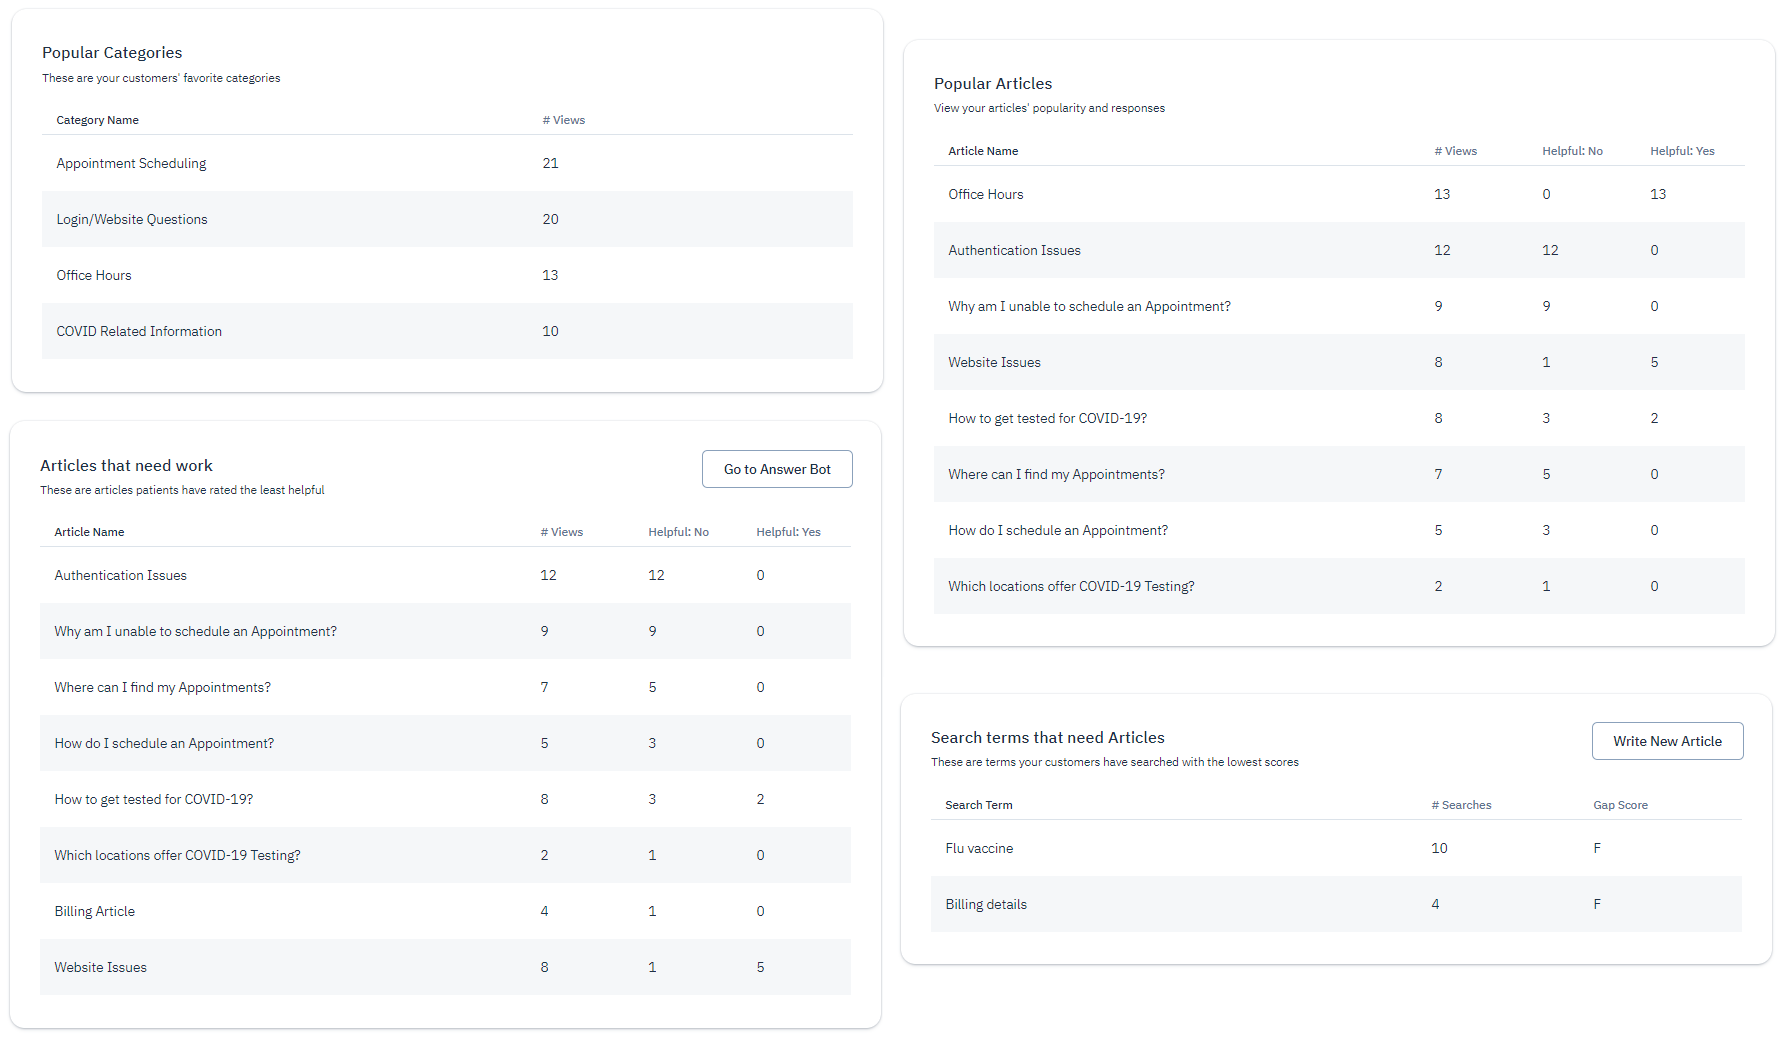
- Most Popular Categories (# of views)
- Most Popular Articles (# of views and a tally of positive or negative feedback)
- Search terms that need Articles (words/phrases customers have searched for with the lowest scores)
- Articles that need work (articles that may need improvement based on the negative feedback)
Updated 4 months ago
