
Creating MedChat Bots
Provides documentation on Chatbot usage and features
What is a Chatbot?
MedChat Chatbots field chats on behalf of live agents, freeing up staff to focus on higher-value and more complex tasks. Chatbots are highly-customizable, allowing you to quickly design simple-to-complex workflows that can be immediately deployed for production use.
How do Chatbots work?
Just like assigning Agents to receive chats from widget topics, you can assign a chatbot to a specific topic or set of topics. When a patient selects a widget topic that has an associated chatbot, the bot immediately engages. You can configure your bot to handle multiple use cases, which can include the following:
- Gathering upfront information from the consumer prior to handing off to a live agent
- Prompting for information to save to an Inbox for later resolution by team members
- Triage questions that can be accomplished without the need for live agents
- Automating conversations and workflows (Scheduling, Rx Refill, etc.)
Creating a Chatbot
You can navigate to MedChat’s Admin > Chatbots to access the Chatbot Overview page. Click New Chatbot to create a new chatbot, or select an existing bot to view or edit.

Note:Chatbot Status has been updated from 'Enabled/Disabled' to the following:
- Published: Chatbot is currently live and enabled for widget topic(s) it is assigned to
- Published (pending changes): Chatbot is live and enabled, but an unpublished draft version exists
- Unpublished: Chatbot is disabled and currently still being drafted
The Chatbot Builder

The Chatbot Builder provides you a canvas to start designing your bot. Simply click on the ‘+’ button to begin adding steps to your flow:
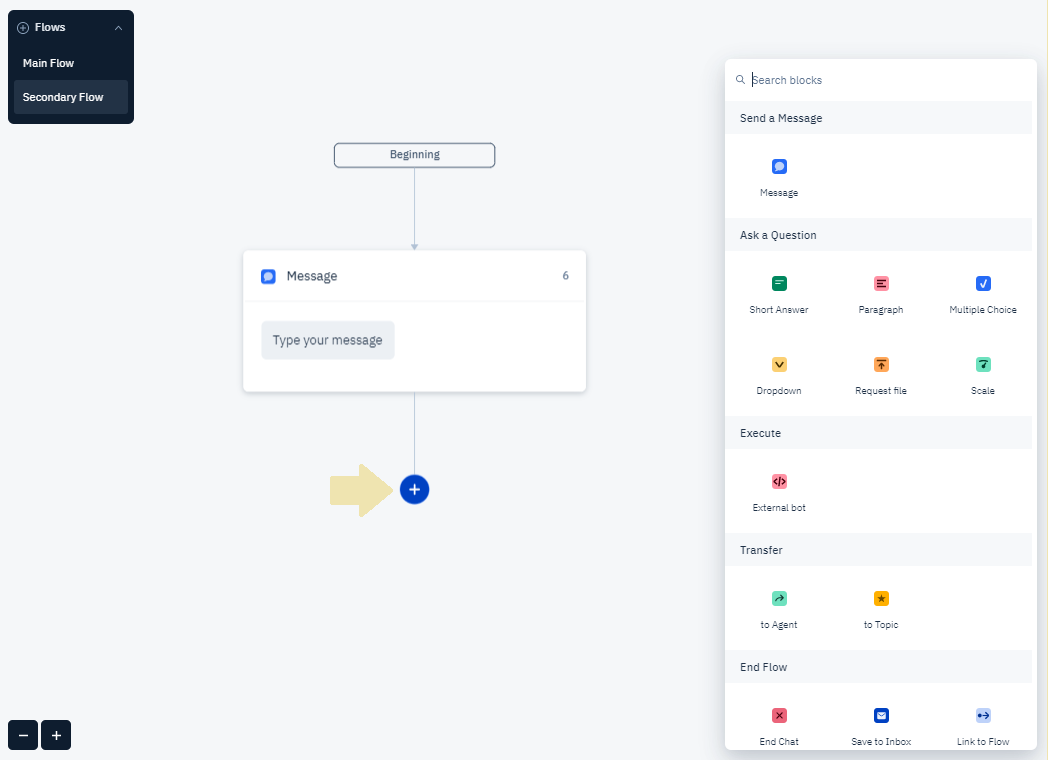
Builder Components
Blocks
The foundation of chatbots, blocks are used to create steps that make up flows. Below are some of the blocks that are currently available:

- Message: Send a friendly message (e.g., Welcome!)
- Answer Bot Article: Show a link that pulls up an Answer Bot article (e.g., 'Frequently asked questions')
- Short Answer: Ask a short answer question (e.g., Enter your Name)
- Paragraph: Provide a long form text area (e.g., Please type in your question)
- Multiple Choice: Have patients select from multiple options; supports branching
- Dropdown: Have patients select one or many options; supports branching
- Date: Prompt for a Date selection using either single date picker or a date range picker. Users can also choose to enter the date values directly instead of using the calendar controls.
- Scale: Have patients choose from a numbered scale (e.g., Rate your pain level from 1 to 5)
- Phone Number(New): Prompt for a valid phone number (including international phone number validation)
- Gender(New): Prompt for patient Gender from a configurable list of possible answers: 'Female', 'Male', 'Non Binary', 'Other', or 'I prefer not to say'
- Request file: Provides the ability for patients to upload a file (e.g., Upload a picture ID)
- Add a Tag: Insert a pre-existing or custom tag
- Remove a Tag: Remove a pre-existing or custom tag
- Assign Attribute: Assign a value or a list of values to a custom attribute (e.g., 'Location' custom attribute = "New York", or 'CovidSymptoms' custom attribute = chills||fever||congestion||etc.).
- Math Operator: Perform simple math equations (e.g., score Health Risk Assessments by gathering customer ratings on HRA questionnaire)
- List Operator: Consolidate or remove items gathered during execution into a list (e.g., consolidate symptoms list from a pregnancy questionnaire and a separate COVID questionnaire)
- External bot: Have your chatbot communicate with 3rd-party external bots*
- Triage Bot: Integrate your bot with triaging systems such as the Isabel Symptom Checker
- NLP: Natural Processing Language (Note: Premium feature, still in development)
- Custom Script: Call a custom script/function to perform tasks (such as Date of Birth mapping to a defined set of Age Ranges) during chatbot execution. (Note: Premium feature -- please reach out to[email protected] for additional details)
- Decision Branch: Branch out to different bot paths based on evaluating inputs against a defined criteria
- Link to Flow: Manage large and complex chatbots by dividing and linking multiple bot flows
- Go to Step: Route your users to a specific step within the same flow or a different flow in a chatbot
- Transfer to Agent: Transfer the chat to an available live agent
- Transfer to Topic: Transfer the chat to a specific widget topic
- End Chat: Ends the chat with the patient
- Save to Inbox: Save the chat to your Inbox for later viewing and resolution
Please refer to ourwebhook documentation on External bot implementation and usage.
Block Panel
The block panel presents the configuration settings of each specific block/block group.
Below is a sample block panel for a Dropdown step, which contains several configurable settings (i.e., names, labels, dropdown options, etc.).
Note: A time delay option is available at the top of the panel (defaulted to 2 seconds) to let you manage the pace your individual chatbot steps will appear on your widget.

Block Groups
Provides the flexibility for a single step in the flow to have multiple blocks, in cases where it makes sense to ‘group’ certain fields during bot execution.
In the sample below, there are 3 blocks currently included in a single step: Message, Short Answer, and Paragraph. Simply click on the ‘Add Block’ button to add more blocks:

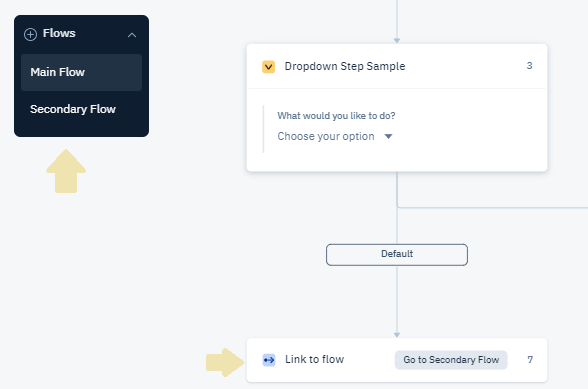
Flows
Flows allow chatbots to be broken down into separate ‘units’ for easier viewing and management -- especially for larger, more complex workflows.
Simply add new flows from the ‘Flows’ panel on the upper left corner of the canvas, and use a ‘Link to Flow’ block to tie your primary and subsequent flows together.
Branching
Available for Multiple Choice and Dropdown blocks, branching allows for dynamic next steps based on the patient’s selection. From the canvas, you can view all branched items at once:

Zoom In/Out
Zoom in or out the canvas as needed using the bottom-left + and - buttons:

Chatbot Preview
You can now preview your chatbot within the builder by clicking on the 'Preview' button found on the bottom-right corner of the page. Select the widget and topic from the preview prompts, and click on 'Preview Chatbot' to start the execution.
Note that you'll need to assign your chatbot to a topic (in the Settings tab) to enable preview.

Colors during Preview executionDuring execution of a chatbot preview, the current step being executed will be highlighted in green, visited steps will be highlighted in purple, and unvisited steps will stay in grey.
Note: This chatbot preview is not a live widget execution, so chats initiated from this page will not register as chat records for your logs, analytics, or reports.
If you want to execute another preview of your chatbot after it completes (or simply want to restart), click on the 'Restart Preview' option displayed above the widget.
Chatbot Settings
The Chatbot Settings provides further customization options for your bot, including which topic(s) it will be assigned to.
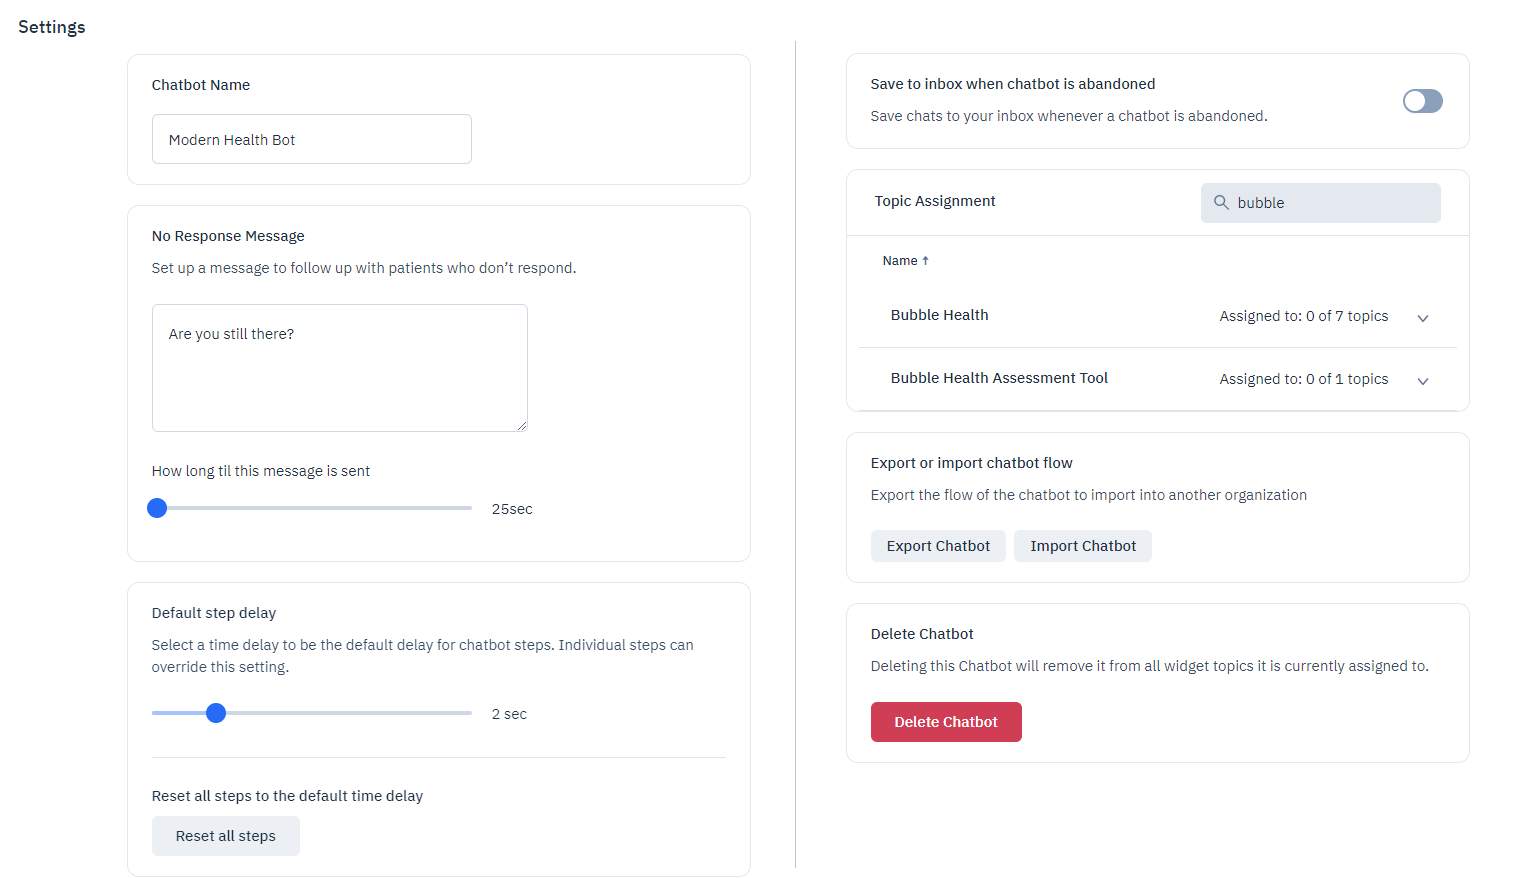
The available settings are as follows:
- Chat Bot Name: Allows renaming your bot as needed
- No Response Message: Allows you to customize a message -- and the wait time before it displays on the widget -- to follow-up on the bot’s last un-answered message
- Default step delay: Allows you to select a default delay setting that will be applied as you build steps into your chatbot. Please note that you can override the default setting by updating the time delay for each individual step.
- Reset all steps to the default time delay: Allows you to reset all existing chatbot steps' time delay to the default
- Save to inbox when chatbot is abandoned: Allows you to configure your bot to save abandoned chatbot executions to your Inbox for later viewing. These will display as “Missed” chat tasks in your MedChat Inbox page
- Topic Assignment: Allows you to easily assign the chatbot to a Topic, whether the topic is Online (i.e., Agents are available to receive the topic), or Offline (i.e., Agents are not available)
For example, if you want a widget topic that will be always received by a chatbot -- regardless of whether agents are available or not -- then check both Online and Offline boxes. If you only want to ‘activate’ your chatbot during off-hours, then only check the Offline box for the topic

- Export or import chatbot flow: Provides the option to exports your chatbot flow file (in .json format) to be imported into another organization
- Delete Chat Bot: Permanently deletes the chatbot
Saving and Publishing Chatbots
Save your progress while creating a draft version of your chatbot, and publish your bot when it's ready for production use with your widget. The Published/Unpublished status indicator on the top right corner of the builder will display additional operations you can perform on your bot.
Saving a Draft Version
As you work on your chatbot flow, you can Save Draft at any time. This will save the current flow as a draft version and will not be reflected in the live widget until you Publish it.
Note: You can save a draft version at any time, even if your current flow contains errors.

As you make changes, you have the option to undo all unsaved changes by clicking Undo Changes.
Publishing for Live Use
When you have completed your flows, it's time to Publish the chatbot for live use. Once published, it will be enabled on any widget topic you have assigned it to.
Note: Before you can publish your chatbot, all errors need to be fixed. You will be notified of existing errors with an indicator next to the chatbot's name.

When your chatbot has no errors, you'll see the Publish button. If there are any unsaved changes, the Publish will first save your latest changes and then automatically publish that version.

Once you have published your chatbot, you'll notice a green indicator next to the updated status that shows Published.
Working with Published Chatbots
You can work on a chatbot draft version while your published version remains live and enabled in production. Once you're satisfied with your updated draft, you can move forward and publish it as your latest version.

Publish latest
If you make additional changes to an already published chatbot, you'll need to Publish latest once you're ready to apply your updates for production use. If you're not yet ready to publish your updates but want to save your progress, click Save Draft.
Note: The same rule applies here in that your chatbot cannot have any errors when publishing the latest version.
Unpublish chatbot
If for any reason you need to disable your chatbot, you can Unpublish it. This will remove your published version only; your Draft version will remain intact.
Show published version
When you've made additional changes to a published chatbot, the status indicator will change to an orange color. These changes can be saved as a Draft version.
If you want to see what your current live version looks like, you can click on Show published version. This will switch the builder view to display the currently published chatbot.

Within the published chatbot view, you can choose to Unpublish chatbot to disable it for live use.
Once you're done viewing the published version, click on Back to Draft to return to the editable version.
Note: Changes you make on the builder while in the published chatbot view will not be saved since you already have a draft version in progress.
Restore to last published
While drafting changes to your chatbot, you might find yourself wanting to revert it back to the version that's currently published. You can do this via the Restore to last published option, which will delete your draft version. Your currently published chatbot will remain intact and enabled in production.
Other Key Features
- Clone your chatbots: Available from the Chatbot List page, you easily clone an existing bot by choosing ‘Duplicate Chat Bot’, minimizing the need to build new similar bots from scratch
- Cut, Copy and Paste: You can cut, copy, and paste individual Steps into a different portion of your Flow
- Move Step(s) to a New Flow: As your bot starts to grow and become more complex, you can automatically break out a step and all subsequent steps underneath it into a brand new flow, keeping your bot easier to manage
- Dropdown Block Custom Input: Give your patients the ability to add their own input if the current selection options doesn’t fit their need
- Webhook integration: You can configure your chatbots to communicate with external endpoints to expand bot capabilities. Please refer to our Developer documentation on webhooks
- Bot Flow notifications/warnings: The bot builder automatically identifies missing components or possible issues with your current flow, and will provide notifications or warnings to help you resolve them

- Save to Inbox if your bot can’t route to an agent: In the chatbot builder, you can configure your ‘Transfer to agent’ and ‘Transfer to topic’ steps to save the chat to your Inbox if the topic is Offline (i.e., no agents available to receive the chats). These chats will display as “Missed” chat tasks in your Inbox.

- Apply colors to your flows for easier identification: You can designate a color for each of your bot flows to help quickly identify which flow you'd want to view next.

- Quick navigation between flows: Within the builder canvas, you can now quickly navigate to a destination flow by clicking the ‘Link to Flow’ step, as well as navigate back to the originating flow by clicking on the beginning node of the flow. If your current flow is referenced in multiple places, then the system will provide a list of originating flows to choose from.

Advanced Features
This section contains advanced features of the MedChat Chatbot. For further questions, please reach out to us at [email protected].
Chat Attributes: System Attributes
Within the chatbot builder, you can now insert system-defined chat attributes that can be called for display during Chatbot execution.
In the example below, the chatbot is configured to display the patient’s name in a Message Block (as seen in the Widget sample screenshot to the right). Note that we have 3 system attributes available today: PatientName, AgentFirstName, and AgentLastName.

Chat Attributes: Custom Attributes
You can define your own custom chat attributes to save/store patient inputs for later use during Chatbot execution.
In the example below, the user has defined 3 custom chat attributes: PatientID, DateOfBirth, and HealthProvider. Each of these custom chat attributes are configured to store respective values that a patient provides during the Block Group step execution. Following the Block Group step, a Message step is configured to call and display the values that have been saved from the earlier prompts (as seen in the sample Widget execution on the right side of the screenshot)

Managing your Custom Attributes
To manage your Custom Attributes, click on the "{ }" icon on the top navigation bar in the Chatbot Builder. This pulls up the Custom Attributes Overview modal, which allows you to view, add, or remove existing attributes. Clicking on a row pulls up the Details modal, which allows you to view and edit the details of a specific custom attribute.
In the example below, a Date of Birth block has been defined to prompt a patient for their birth date during a chatbot execution. The value that the patient enters will be saved under a user-defined 'DateOfBirth' custom attribute, which will subsequently be displayed in the following Message step in the chatbot flow.

To drill down to the 'DateOfBirth' attribute information, MedChat Admins can pull up Overview to access the full list of attributes. Clicking on the 'DateOfBirth' Attribute will display the Details dialog, where users can assign/edit attribute name, define the data type (note: 'DateOfBirth' is defined as data type of 'datetime' in this example), and view which blocks in the bot are currently referencing or storing the attribute. See below for a list of supported data types.
Note: Clicking on a 'stored' or 'referenced' block under Details block usage will navigate you to the specific block in your chatbot flow.
Supported Data TypesThe following Data Types are supported for Custom Attributes:
- Boolean: accepts only True or False
- Date: accepts valid date formats
- Gender: accepts the following values: Female, Male, Non Binary, Other, I prefer not to say
- List: accepts a list of values from a dictionary or from a list captured from a multi-select options step
- Number: accepts only numerical values
- Phone Number: only accepts valid phone number formats (supports international formats)
- Range: accepts a range of values (e.g., 1 to 20)
- String: accepts a sequence of alphanumeric and special characters
Setting Custom Attributes as Default Values
You can now use stored values from your Chat Attributes for auto-display or auto-selection as default input values for downstream steps.
In the example below, a multiple choice step has been set up to prompt a user to make selections. The user's selected values are configured to be stored under the 'PlansLastYear' attribute (left-side screenshot). On the next multiple choice step, the 'PlansLastYear' inputs will be auto-selected by default (right-side screenshot) during bot execution.

Below is a preview of the chatbot execution, where user choices from the "Choose last year's enrolled plans" step will be the auto-selected options in the following "Choose planned enrollment this year" step.

Input Type Definition
You can now define what input types are allowed for your Short Answer blocks (i.e., numbers, letters, special characters, etc.).
In the sample below, the Short Answer 'Enter your Patient ID' step is configured to only accept input type 'Numbers', so non-numerical entries will be rejected during Chatbot execution (as seen in the sample Widget execution on the right side of the screenshot).

Complex Decision Branching
Decision Branching allows you to configure your chatbot to branch out to different flows, based on evaluating inputs against criteria you have defined in the Decision Branch step.
In the use case sample below, we have a block that collects Gender and Age information during chatbot execution. User inputs to Gender and Age are then saved to custom attributes, which are in turn used in evaluating the defined Decision Branch criteria:
- If Gender is F (for female) and Age is >= 64, then the bot will direct the user to the “Female >= 64 questionnaire” branch/flow;
- If Gender is F and Age is < 64, then the bot will direct the user towards the “Female < 64 questionnaire” flow;
- If neither of the above criteria are met (e.g., if Gender is M), then the bot will direct the user down the “Male questionnaire” flow.

The image below shows a collection of available operators and options for defining criteria to evaluate values, custom attributes, and properties in the Decision Branch step panel.
Note: The Decision Branch block has been enhanced to include a new operator of "contains one or more", allowing your chatbot to compare between 2 list attributes and identify if one list includes one or more items contained in another list before proceeding.

Assign a custom value to Attributes
You now assign a value to a custom attribute using the new Assign Attribute block. In the example below, a block group step prompts the patient to select their location (i.e., Colorado or Illinois). If the patient selects Illinois, the branch proceeds down the 'Illinois' path, which follows an Assign Attribute step that assigns the custom attribute "HealthOffice" as "Champaign, IL Office".

Downstream steps (such as the following Message step in the above example) that call the custom attribute "HealthOffice" will now display "Champaign, IL Office" going forward. See the chatbot execution screenshot sample below:

Apply Math Operations during execution
You can now include simple mathematical operations in your chatbot flow by using the Math Operator step.
In the example below, we have a simple Health Risk Assessment (HRA) that prompts a patient to score themselves (between 1 to 4) on a General Health and Nutrition questionnaire. The patient inputs are then added up and captured in the new Math Operator step as the 'HRAScore'. The patient is then routed -- via a Decision Branch step -- to flows that will provide the appropriate recommendations based on their HRAScore.

The following image shows a sample of how the chatbot above will execute in the widget:

Aggregate or Remove Items during execution
You can now aggregate inputs and lists -- as well as remove items from a current list -- during chatbot execution by using the List Operator step.
In the example below, a chatbot -- whose main audience are pregnant patients checking into a clinic -- are prompted for current pregnancy symptoms, but then are also asked for possible COVID symptoms in a separate step.
The inputs from both Pregnancy Symptoms (i.e. saved in a {{PatientSymptoms}} attribute) and COVID Symptoms (i.e., saved in a {{CovidSymptoms}} attribute) are then aggregated and saved into the {{PatientSymptoms}} attribute via the List Operator step. The aggregated Patient Symptoms list is then presented in the subsequent step.

The following image shows a sample of how the chatbot above will execute in the widget:

Inbox and Chatbots
The MedChat Inbox is a repository for chatbot-only chats that are captured for later viewing and resolution. Agents can view these ‘chat tasks’, claim/un-claim them, and ultimately flag them as resolved.

Types of Chat Tasks
- Follow Up chat task: If Chatbot ‘End Flow’ is ‘Save to Inbox’, then the chat ends up as a ‘Follow-up’ chat task on your Inbox
- Missed chat task: If a Chatbot flow did not complete its execution (e.g., the patient loses network connection or chooses to abandon* the chat) or was not successfully able to hand-off to a live agent, then the chat ends up as a ‘Missed’ chat task on your Inbox.
*Refer to “Save to inbox when chatbot is abandoned” configuration under Chatbot Settings.
Updated 10 months ago